
 Pin it
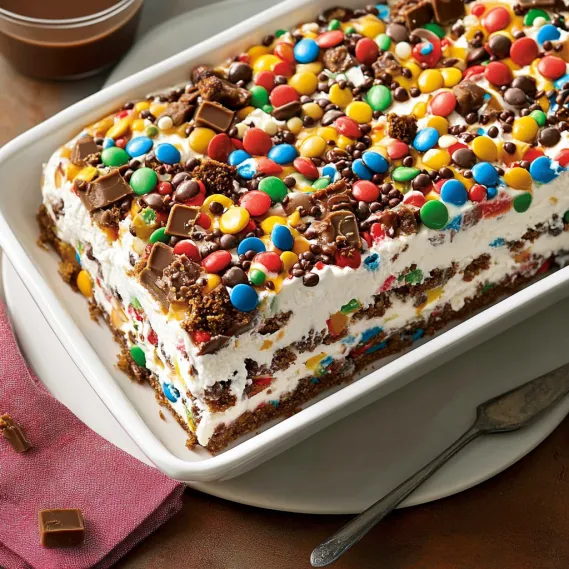
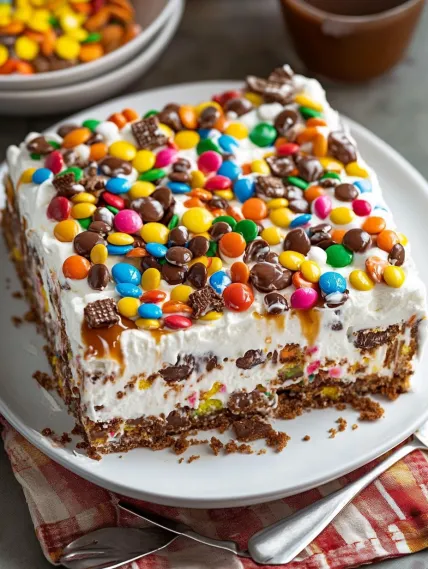
My go-to emergency treat for last-minute parties is this Ice Cream Sandwich Cake. It's the perfect answer when you need to wow guests but don't want to turn on the oven. This stacked delight transforms store-bought items into a stunning dessert that'll make everyone think you slaved away for hours.
The first time I whipped this up was for my daughter's birthday bash when our oven broke down the night before her party. What started as a panic solution has turned into the most asked-for sweet treat at our backyard get-togethers, with everyone begging me for the supposedly "fancy" instructions.
Ingredients
- Ice cream sandwiches: They create the backbone of our treat and give that perfect mix of chocolate and vanilla in each mouthful. Go for a good brand since they'll cut better when frozen.
- Cool Whip: Its fluffy consistency makes for the ideal creamy filling between layers. Don't forget to thaw it completely so it spreads smoothly.
- Caramel sauce: Brings a sweet, deep flavor that turns this simple dessert into something special. Let it warm up a bit so it pours nicely.
- Symphony chocolate bars: Their bits of toffee and almonds bring amazing crunch. Chop them into tiny pieces so they spread evenly.
- Mini M&Ms: These tiny candies add bright pops of color plus chocolate bits throughout. The smaller size works way better than regular ones when you're cutting slices.
- Sprinkles: Pick fun colors that match your party theme for an extra festive look that gets everyone excited.
How To Make Ice Cream Sandwich Cake
- Base Layer:
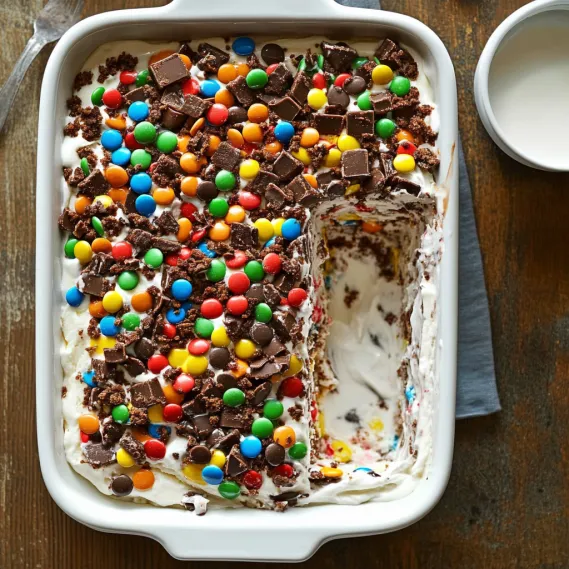
- Line up ice cream sandwiches across the bottom of a 9×13 dish. You'll need to trim some to fill in all the gaps. Pack them snugly together to make a solid bottom with no spaces showing.
- First Cream Layer:
- Gently spread half the thawed Cool Whip over your sandwich base using a flat spatula. Go slowly so you don't pull up the sandwiches. Then drizzle half the caramel in a back-and-forth pattern all over.
- Second Sandwich Layer:
- Place another full layer of ice cream sandwiches on top, cutting pieces as needed to cover the edges completely. Push down slightly to squish the layers together.
- Topping Layer:
- Spread the leftover Cool Whip across the top layer. Pour the remaining caramel all over, then quickly add your chopped Symphony bars, mini M&Ms, and fun sprinkles before the caramel hardens.
- Freezing:
- Wrap the whole dish with plastic without touching the decorations on top. Stick it in the freezer for at least two hours or until totally firm, though overnight works best for clean cutting.
 Pin it
I'll never forget how my son's face lit up when I first cut into this dessert at his baseball team party. His teammates actually gasped when they saw the pretty layers, and they finished every bit. The mix of caramel with the crunchy Symphony pieces creates this amazing taste that reminds me of the ice cream treats my grandma used to make for me.
Personalize It
You can easily change this dessert to fit what you like or what's in your kitchen. Maybe try mint chocolate chip sandwiches for something refreshing, or go with cookie dough sandwiches for an extra rich version. You can switch up the toppings for different occasions too - try red and green candies for Christmas parties, or black and orange sprinkles when Halloween comes around.
Storage Tips
You can keep the finished dessert in your freezer for about a week. Just wrap it tightly in plastic then add foil to stop ice crystals from forming. If you want to store it longer, I'd suggest waiting to add the candy decorations until right before you serve it, as they might fade in the freezer after a while. The basic cake without fancy toppings will stay good for up to a month.
 Pin it
Serving Suggestions
This crowd-pleaser fits in at casual family dinners or fancy birthday parties. For everyday meals, just cut it into squares and pop them onto plates. If you're going fancy, try cutting thin slices and standing them on their sides to show off all those pretty layers. Adding warm caramel or hot chocolate sauce right before serving makes it extra special. Want to go all out? Add a small scoop of vanilla ice cream on the side for a truly over-the-top treat.
Frequently Asked Questions
- → Can I swap the candy toppings?
Of course! Use whatever you like - nuts, crushed cookies, fresh fruits, or different candies to switch it up.
- → How long does it need to freeze?
Freeze it for at least 2 hours, but for a firm texture, leave it 4–6 hours or overnight if possible.
- → Can I prepare this ahead of time?
Yes, you can make it a day or two early and store it in the freezer. Just keep it covered to prevent any freezer smell or texture changes.
- → What kind of dish should I use?
A dish around 9x13 in size works well, giving you enough space for even layers to fit in neatly.
- → Can I use whipped cream instead of cool whip?
You can, but remember whipped cream might not hold up as well in the freezer compared to cool whip.