
 Pin it
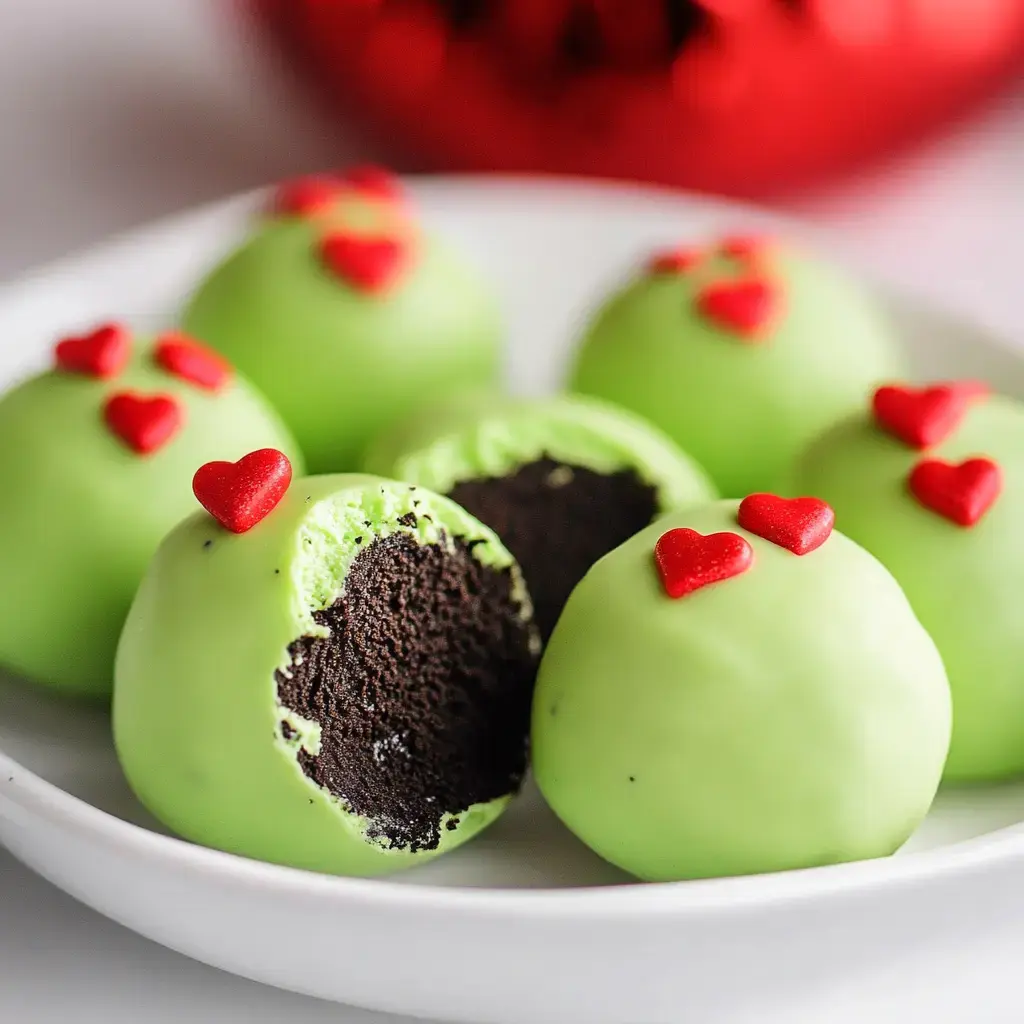
Looking for holiday treats that'll make everyone smile like their hearts grew three sizes bigger? These green Christmas Truffles bring the wow factor - think smooth, ready-in-minutes treats covered in bright green coating with cute little red hearts on top. They're fantastic for gatherings, sweet exchanges, or just enjoying during the holiday season!
What Makes These Treats Incredible
The coolest thing? You only need 5 simple ingredients and absolutely no baking experience to whip up these cute goodies! They're great for making with children (just be ready for some green-stained fingers), and they're always the first sweets to vanish from any holiday table. They're also a fantastic activity while enjoying your favorite holiday movies!
Your Ingredient List
- Oreos: One standard pack (36 cookies) - don't remove anything!
- Cream Cheese: 8 oz softened whipped variety
- Almond Bark: 16 oz white variety for dipping - it melts beautifully
- Green Food Coloring: Get the gel kind, not the runny stuff
- Red Hearts: Around 30-40 small decorative ones
Creating Your Sweet Masterpieces
- Pulverize Your Cookies
- Start by turning those Oreos into fine dust. Toss them into your food processor and run it until you've got something that looks like dark chocolate sand. Don't have a processor? Just put cookies in a plastic bag and smash them with a rolling pin. Make sure they're super fine - chunky bits won't work for smooth truffles!
- Mix Your Dough
- Here comes the messy fun - put all those cookie crumbs in a large bowl with your soft cream cheese. Get your fingers in there and mix until completely blended. You'll know it's done when it looks like thick, dark dough that sticks together when squeezed. If it's too sticky, cool it in the fridge for about 10 minutes.
- Shape Your Balls
- Get a cookie scoop (or regular tablespoon) and start forming portions. Roll each between your hands to create smooth balls - try to make them about ping-pong ball sized. Place them on a paper-lined cookie sheet as you go. Helpful hint: if the mix keeps sticking to your hands, try a light dusting of powdered sugar!
- Cool Them Down
- Your balls need to harden before dipping. Stick the whole tray in your fridge for at least 60 minutes, or if you're short on time, try 30 minutes in the freezer. They should feel solid when touched.
- Create Your Coating
- While they're cooling, let's get that green covering ready. Break your almond bark into chunks and place in a microwave-safe container. Heat in 30-second intervals, mixing thoroughly each time. Don't rush or you'll ruin the chocolate! Once smooth, slowly add green coloring until you get that perfect bright shade.
- Start Dipping!
- Now for the fun transformation! Drop each cold ball into the green mixture. Use a fork to roll it around completely, then lift it out and tap to remove extra coating. You want an even layer - not too thick or thin. Gently slide each one back onto the paper.
- Add Heart Decorations
- Work fast! While the coating is still wet, place a red heart on each ball. This is the moment that gives each treat its special character - make sure those hearts look just right!
- Final Firming
- Back to the fridge they go! Give them about half an hour to completely harden. You can tell they're ready when the coating is firm to touch and doesn't feel sticky anymore. Now try to save some for others!
The Charm Behind These Treats
You know how every holiday gathering needs that one amazing sweet that gets everyone talking? This is it! These balls aren't just adorable - they're tiny bites of rich, chocolatey goodness that look like they jumped straight from a storybook. The best part? They're nearly impossible to mess up. If you can smash cookies and form balls, you can make these beauties. And seeing people's reactions when they notice those tiny red hearts? That's the real holiday magic!
Customize Your Creation
Wanna know what's really awesome about these treats? You can change them up however you want! Try using different Oreo types - the mint ones are fantastic for Christmas vibes, or go for birthday cake flavor for a fun switch. Don't want green? Make them different colors for other celebrations (though they wouldn't be the same anymore!). Some people even like to add white chocolate drizzles on top for a snowy look. Your creativity can grow bigger than you thought possible!
Turn It Into A Group Activity
Imagine this: you've got your friends over, your favorite holiday movie playing, and everyone's making these treats together! Set up a dipping station with bowls of melted coating and decorations. Let each person try dipping and decorating - sure, it might get messy, but that's part of the fun! Turn on some festive tunes, make some hot chocolate, and enjoy the whole experience. Just maybe wear something you don't mind getting stained (that green coloring is serious!) and keep plenty of napkins handy.
 Pin it
Tips For Perfect Results
Let me share some wisdom from making tons of batches (including a few tasty mistakes). First, your cream cheese needs to be REALLY soft - leave it out for at least an hour before you start. When melting the almond bark, take your time. Rush it and you'll get lumps, which ruins everything! If your coating starts getting too thick during dipping, warm it in the microwave for 10 seconds. And here's my favorite trick: keep a damp paper towel nearby to clean your fingers between rolling - it keeps everything looking nice!
Storing Your Sweet Creations
Made too many? These treats will stay good in the fridge for up to two weeks if kept in an airtight container. Just put wax paper between layers so they don't stick together. Taking them to a party? Pack them the same way and keep them cool until it's time to serve. They can even go in the freezer for up to three months - just let them thaw overnight in the fridge when you want to eat them. Want to give them as presents? Put them in pretty holiday containers or clear bags, add a ribbon, and watch folks smile brighter than Christmas lights!
Frequently Asked Questions
- → Can I try a different coating?
Melted white chocolate works fine. Be careful when heating—add coloring slowly. It can be tricky but worth the effort!
- → How do I keep them fresh?
Store in an airtight container in the fridge. They’ll stay good for up to a week. Don’t leave them sitting out, and use parchment paper between layers to prevent sticking.
- → What if I need a dairy-free option?
Use a dairy-free cream cheese substitute and dark chocolate for the coating. Check that your cookies are milk-free too. It may taste slightly different, but it still works!
- → Can these be made ahead of time?
Absolutely! Prepare them up to three days in advance if you store them in the fridge. They taste best when fresh, but a little planning can save time!
- → Don’t have a food processor?
Use a ziplock bag to crush the cookies finely with a rolling pin. It takes longer, but you’ll get the same smooth mix—you just need to put in some elbow grease.
- → What if the mix gets too soft?
Chill the mixture for longer before rolling. Work quickly when dipping and keep everything cold. Patience pays off for the perfect result!
- → How do I safely transport them?
Pack tightly in a sturdy box to keep them from shifting. Use an ice pack if it’s warm outside and handle them gently during travel. Careful packing ensures they’ll arrive looking great!
- → Can I make them faster?
Buy pre-made cookie crumbs instead of crushing your own. This saves a step, but you’ll still need to chill them—there’s no shortcut for that part!
- → How do I make a huge batch?
Just double the ingredients! You’ll need more chilling space and a bit more time. Keeping the mixture cold helps when handling larger amounts.
- → How can I add more flavor?
Experiment by mixing in mint extract or using different flavored cookies. Try varied heart candy colors, but don’t skip the green coating—it’s part of the charm!
- → The candy coating feels too thick. Help?
Add a little vegetable oil to thin it out. Tap off any extra coating before setting each ball. Keep the coating warm but not too runny—perfect balance is key.
- → What if the balls aren’t smooth?
Mix the dough longer to get rid of chunks. Chill it again if it feels too soft when shaping. Warm hands can help smooth things out. Uniform sizing also makes a difference—it’s all about practice!
Conclusion
If you like these, try making cake pops or chocolate truffles! Both are great for gatherings.