
 Pin it
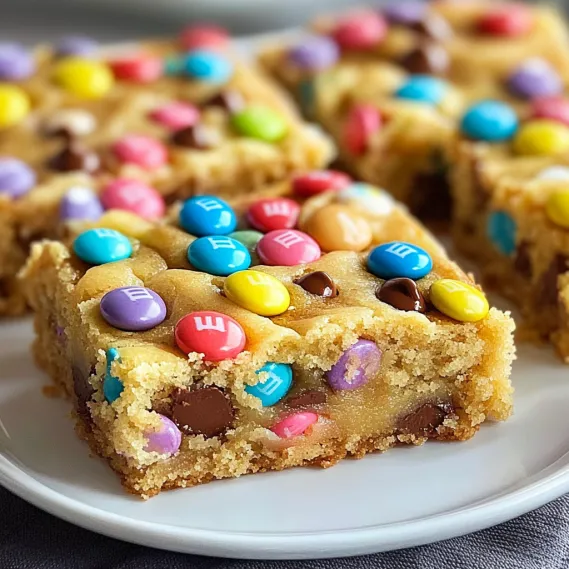
Soft, gooey cookie squares packed with spring-colored Easter candies make an amazing seasonal snack that's ready super fast. Using cake mix as your starting point guarantees great results without much measuring, and the bright M&Ms sprinkled throughout look fantastic while adding chocolate goodness in every mouthful.
I came up with these cookie squares when I needed a quick treat for my kid's Easter event at school. With barely any time to bake, this easy recipe was a lifesaver but still looked fun and special. The kids gobbled them up right away, and I got asked for the recipe by three different parents before the party ended.
Key Ingredients and Smart Picking Tips
- Yellow Cake Mix: Every brand works fine, but stay away from ones with pudding inside. The type in tubs that's stabilized makes frosting that lasts longer.
- Large Eggs: They hold everything together while making it rich and sturdy. Eggs at room temp mix in better than cold ones.
- Vegetable Oil: Gives moisture and that yummy soft, chewy feel. You can swap in melted butter for deeper flavor.
- Vanilla Extract: Boosts the sweetness with warm flavor notes. Real vanilla extract tastes way better.
- Easter M&Ms: Go for the seasonal soft colors for a spring look. The ones with peanut butter inside add an amazing taste twist that makes these simple squares really stand out.
- Semi-Sweet Chocolate Chips: Add extra chocolate goodness throughout. Tiny chips spread more evenly in the mix.
I've noticed that mixing standard Easter M&Ms with the peanut butter kind creates this awesome flavor combo that takes these simple squares to the next level. My hubby always eats all the peanut butter ones first!
Step-by-Step Cooking Guide
- Step 1: Get Your Baking Pan Ready
- Heat your oven to 350°F (175°C) and put parchment paper in a 9×13-inch baking dish, letting it hang over the sides so you can lift out the bars easily. Spray the paper lightly with non-stick spray. This way your squares won't stick and you can take them out in one piece.
- Step 2: Mix Up Your Dough
- In a big mixing bowl, throw together one box (15.25 oz) yellow cake mix, 2 large eggs, 1/3 cup vegetable oil, and 1 teaspoon vanilla extract. Mix with an electric beater or stir hard by hand until it's all combined into thick, sticky dough. It'll be much thicker than regular cake batter.
- Step 3: Toss In Colorful Additions
- Set aside about 1/4 cup each of Easter M&Ms and chocolate chips for the top. Carefully mix 1 cup of Easter M&Ms and 1/2 cup of semi-sweet chocolate chips into the dough with a wooden spoon or rubber spatula. Just stir enough to spread them out without smashing the candies.
- Step 4: Spread It Out And Decorate
- Push the dough evenly into your prepared baking dish, using a spatula to get it into the corners. The dough will be sticky, so you might need to wet your spatula to keep it from sticking. Press the M&Ms and chocolate chips you saved onto the top of the dough to make it look bright and festive.
- Step 5: Bake It Just Right
- Bake in your hot oven for 20-25 minutes until the edges turn light golden and the middle is just set but still a bit soft. When you stick a toothpick in the middle, it should come out with a few moist crumbs, not wet batter. Let it cool completely in the pan before cutting into squares with a sharp knife.
My family really loves these squares when I use both regular and peanut butter M&Ms for extra flavor. My husband says they taste way better the day after baking once the flavors have had time to blend. My kids have fun helping arrange the candies on top in cool patterns before baking, which turns this simple recipe into a fun family activity every Easter.
The Magic Behind Perfect Wok Skills
What makes these cookies so special is how they feel when you bite in - crunchy bottoms with soft, tasty fillings. I've learned that controlling wetness at each step is super important. First, you gotta squeeze that salted cabbage really well to get rid of extra water that would make the filling soggy. Then, the cornstarch doesn't just hold the filling together, it also soaks up any leftover moisture. Finally, the way you cook them - fry, then steam, then fry again - makes that awesome crunchy bottom while making sure the filling cooks through just right.
Prep Ahead Tricks for Parties
What I love most about this recipe is how you can make it ahead of time. When I'm having people over, I often work in stages: shape and freeze the balls up to a month early, coat them the day before (keeping them covered in the fridge), and just bake them when guests are about to arrive. The smell of these baking fills the whole house with an amazing aroma that gets everyone excited to eat. For bigger parties, I make two batches, keeping the second one warm in a low oven until we need it.
Turning Extras Into Brand New Dishes
If you end up with leftover cookies (which hardly ever happens at my place!), you can turn them into completely different meals. Break them up into scrambled eggs for a French-style breakfast mix, or cut them up and toss into a simple green salad with spicy dressing for a light lunch. My favorite way to use leftovers is to put halved cookies on top of creamy grits, making a satisfying breakfast that carries the flavors into the next day.
Smart Cook's Advice
- Let the balls sit for 5 minutes after baking before you eat them - this makes the inside set up just right
- For extra flavor, mix a teaspoon of smoked paprika into your panko crumbs
- If you can't find cookies in your area, you can buy them online from real suppliers like Bourgeois Meat Market or The Best Stop
- Give people multiple dipping choices - spicy remoulade and cool ranch along with the Louisiana dipping sauce
- For a fancy look, put the balls on a platter with bits of chopped parsley, purple cabbage, and yellow bell pepper scattered around to show the traditional green, purple, and gold
Frequently Asked Questions
- → Can I pick a different kind of cake mix?
- Totally! While yellow cake mix gives a classic taste that’s close to chocolate chip cookies, you can swap it for something else like chocolate, white, or even funfetti cake mix. It’ll keep that gooey texture but have its own unique flavor.
- → What’s the best way to store these cookie squares?
- Pop them into an airtight container, and they’re good on your counter for up to 5 days. If you want to save them longer, freeze them! Let them cool first, then layer them with parchment paper in a freezer-safe container. They'll stay fresh for about 3 months. Thaw before eating.
- → Do I have to use M&Ms?
- Not at all! Switch it up with stuff like white chocolate chips, sprinkles, chopped nuts, or even mini marshmallows. You could also try candies like Kinder pieces, Milka chocolate chunks, or themed chocolates for other holidays.
- → How come my cookie bars turned out dry?
- Dry bars often mean they were baked a little too long. Ovens can vary, so start checking around 18 minutes. They’re done when the edges look lightly golden and the middle seems set but still soft. Remember, they’ll firm up as they sit, so take them out a tad early for the perfect chew!
- → Can I make more by doubling the recipe?
- Sure thing! Use two 9×13 pans if you double up. Avoid using one giant pan—the edges might overcook. For big batches, it’s easier to bake in smaller sets.
- → How do I know these are finished baking?
- When the edges get a little golden and the middle sets but still feels soft, they’re ready. Sticking a toothpick in should pull out just a few crumbs, not wet batter. It's better to underbake slightly for chewy results since they'll firm up as they cool.