
 Pin it
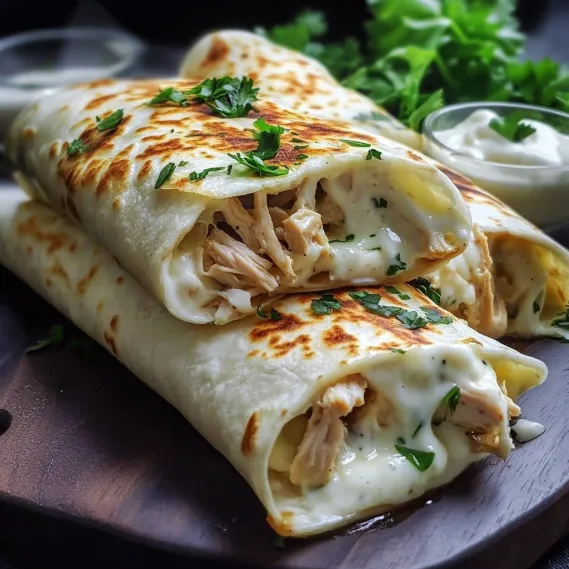
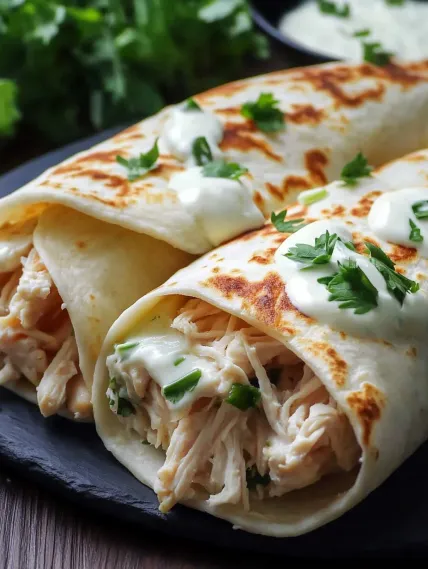
This gooey garlic chicken wrap turns ordinary items into a scrumptious dinner that tackles both your empty stomach and food desires. When you mix soft shredded chicken with melty cheeses and flavorful garlic, you get a stuffing that nobody can turn down once it's wrapped in a crispy, golden-brown tortilla.
I came up with these wraps one crazy evening when we needed something fast but filling. My family loved them so much they've become our backup plan for those nights when ordering food seems easy but we'd rather eat something homemade.
What You'll Need
- Shredded chicken: Gives you good protein and works well fresh or leftover
- Mozzarella cheese: Makes that awesome stringy pull when it gets hot
- Cream cheese: Makes everything creamy and holds the filling together
- Sour cream: Adds a nice zing that works against the savory stuff
- Fresh garlic cloves: Packs way more punch than the powder ever could
- Fresh parsley: Makes the whole meal pop with green flecks and herb flavor
- Paprika: Adds a bit of smoky taste and nice reddish color
- Flour tortillas: Need to be big and soft for easy wrapping and browning
- Mixed greens: Bump up the health factor and give some crunch against the soft filling
Steps For Making Garlicky Cheese Chicken Wraps
- Mix your filling:
- Throw all your filling stuff into a big bowl and stir until fully mixed. Make sure you work out any cream cheese chunks for a smooth blend. The hot chicken will help melt the cheese a little for easier mixing. Check that the garlic bits are spread out everywhere.
- Put wraps together:
- Spread each tortilla flat and drop one fourth of your mix just below the middle point. The trick is putting the filling slightly lower than center so rolling works better. Sprinkle some greens on the mixture but don't go crazy or you won't be able to close it.
- Wrap them up:
- Fold both sides toward the middle then roll from bottom to top keeping everything snug. Press down gently to close the edge. If you roll it right, it'll stay shut while cooking without needing toothpicks.
- Make them crispy:
- Get your pan hot enough that water drops sizzle right away. Add just a bit of oil to barely cover the surface. Put wraps seam-side down first so the heat glues them shut. Cook until golden brown and push down occasionally with your spatula so they touch the pan evenly.
 Pin it
Garlic really makes these wraps special. I found just the right amount after trying several batches with my family. Four cloves give enough flavor to make them stand out without being too much for sensitive eaters. Even my daughter who usually picks garlic out asks for these wraps specifically.
Keeping And Warming
These wraps stay good in the fridge up to three days if you keep them in a sealed container. It helps to put parchment paper between them so they don't stick together. You can warm them in the microwave wrapped in a damp paper towel for about 45 seconds but they turn out much better in an air fryer or small oven at 350°F for 5 minutes to get that crunch back.
Switch It Up
This basic version works as a starting point for tons of changes. Try adding chopped roasted red peppers or sun dried tomatoes for something different. You can swap mozzarella for pepper jack if you want some heat or mix cheeses like cheddar and Monterey Jack. For more nutrients, mix finely chopped spinach right into the filling where it'll practically vanish during cooking but still give you the good stuff.
 Pin it
What To Eat With Them
These wraps taste best with sides that balance them out. A simple cucumber and tomato mix with just lemon juice and olive oil cuts through the richness nicely. For a bigger meal, add sweet potato fries or tomato soup for dipping. I usually put out some ranch or spicy mayo too for anyone who wants extra sauce.
Do-Ahead Options
You can make the filling up to two days early and keep it in the fridge so putting them together later is super quick. You can even roll the entire wraps and store them uncooked with plastic wrap between each one. When you're ready to eat, just cook them as normal but maybe add an extra minute per side to make sure the filling gets hot all the way through.
Frequently Asked Questions
- → How do I keep it low-carb?
Swap out regular tortillas for low-carb or keto-friendly ones, which you can find in most supermarkets.
- → What’s the easiest way to shred chicken?
Grab cooked chicken thighs or breast and shred with two forks, a mixer, or even your hands for a chunkier texture.
- → Can I prep these in advance?
Yes, make the filling ahead and keep it in the fridge for up to three days. Assemble and cook the wraps fresh when needed.
- → What works instead of mozzarella?
You can use cheddar, Monterey Jack, or anything melty with a similar texture instead.
- → How do I get wraps super crispy?
Preheat your pan, add a little olive oil, and press down on the wraps as they cook to make them extra crunchy.
- → Can I put extra stuff in the filling?
Of course! Throw in bacon bits, sautéed onions, peppers, or jalapeños for more kick.