
 Pin it
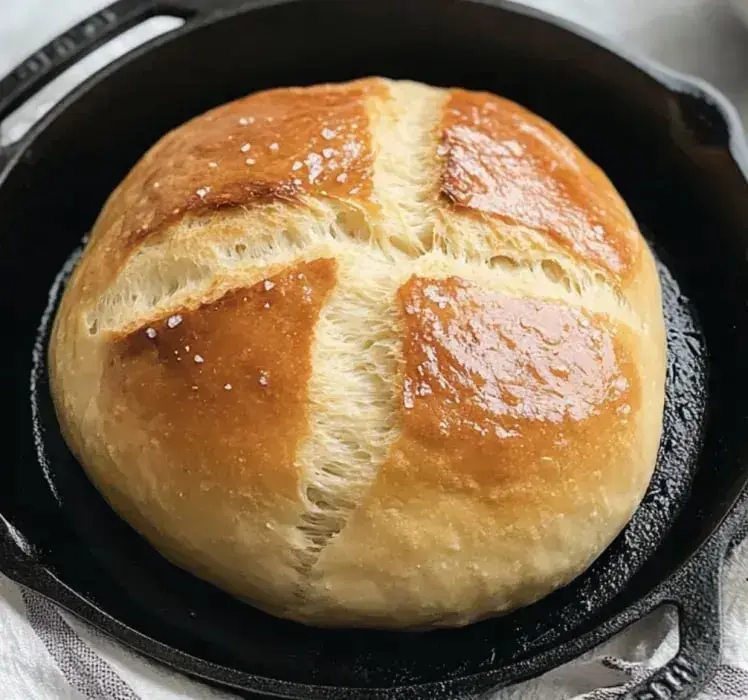
This crusty-on-the-outside, soft-on-the-inside skillet bread requires just six simple ingredients and transforms your kitchen into a bakery. Perfect for beginners, this versatile loaf pairs beautifully with everything from soups to olive oil dips.
I discovered this recipe during a snowstorm when I couldn't get to the store, and it's become our family's most-requested bread since. My children now recognize the distinctive aroma wafting through the house and come running to the kitchen.
Ingredients
- Warm Water: Provides the perfect environment for yeast activation and creates ideal dough hydration for a tender crumb
- Honey: Feeds the yeast and promotes beautiful browning on the crust
- Active Dry Yeast: Creates the rise look for bubbling action to ensure freshness
- Olive Oil: Adds moisture and tenderness to the finished bread
- Bread Flour: Delivers higher protein content for better structure and chewiness
- Salt: Enhances flavor and strengthens gluten development for proper texture
Step-by-Step Instructions
- Start the Yeast:
- Combine warm water that feels like comfortable bath water with honey and yeast in a mixing bowl. Let this mixture rest for a full 10 minutes until it becomes frothy and develops a distinctive yeasty aroma. This step confirms your yeast is alive and active.
- Mix Dough:
- Add bread flour gradually starting with 2½ cups along with olive oil and salt to the activated yeast mixture. Begin mixing on low speed if using a stand mixer or stir with a wooden spoon until ingredients are incorporated. Continue adding flour ¼ cup at a time until the dough pulls away from the sides of the bowl while remaining slightly tacky.
- Knead:
- Process the dough for a full 5 minutes in the mixer or transfer to a lightly floured surface and knead by hand. The dough should become smooth and elastic feeling like a soft earlobe when properly kneaded. This develops the gluten structure necessary for a good rise.
- First Rest:
- Place the dough in an oiled bowl and cover with a clean kitchen towel. Allow it to rise in a warm draft-free area for 30 minutes or until noticeably doubled in size. This initial fermentation develops flavor and creates carbon dioxide bubbles that give bread its airy texture.
- Shape It:
- Gently deflate the risen dough and form into a tight ball by folding the edges toward the center and pinching them together. Transfer the shaped dough to a well-oiled cast iron skillet smooth side up. Cover again and allow a second rise for 30 minutes until puffy and expanded.
- Get Ready:
- Position an oven rack in the lower middle section and preheat to 400°F. Using a sharp knife or razor blade score the top of the dough with a crosshatch pattern or simple slashes about ¼ inch deep to control expansion during baking.
- Bake:
- Place the skillet in the preheated oven and bake for 12-20 minutes depending on your oven. The bread will develop a golden crust that deepens quickly toward the end of baking. The bread is done when it sounds hollow when tapped on the bottom and reaches an internal temperature of about 190°F.
- Finish:
- Remove from oven and immediately brush the hot crust with melted butter. This adds flavor and softens the crust slightly. Sprinkle with flaky sea salt if desired for an extra flavor dimension. Allow to cool slightly before slicing.
The honey in this recipe is my secret weapon. Not only does it feed the yeast for a better rise, but it creates that beautiful golden color and adds a subtle sweetness that balances the salt perfectly. My grandmother taught me this trick years ago, and I've never made bread without it since.
Perfect Rising Environment
Creating the ideal environment for your dough to rise makes all the difference in the final texture. I turn my oven on to its lowest setting for just 2 minutes, then turn it off completely before placing my covered dough inside. This creates a warm, draft-free space that encourages yeast activity without killing it. Your dough should double in size during both rises, appearing puffy and soft to the touch.
Flavor Variations
This basic recipe serves as a wonderful canvas for creativity. Add 2 tablespoons of fresh chopped rosemary and 1 tablespoon of lemon zest for a Mediterranean flair. For a savory version, mix in ½ cup grated Parmesan and 2 cloves of minced garlic. Sweet bread lovers can add ¼ cup dried cranberries and 2 tablespoons of orange zest. Simply fold additional ingredients in during the initial mixing phase for even distribution.
Storage Solutions
Store completely cooled bread in a paper bag for up to 24 hours to maintain that crispy crust. For longer storage, wrap tightly in plastic wrap and keep at room temperature for up to 3 days. To restore freshness, sprinkle the loaf lightly with water and reheat in a 350°F oven for 5-10 minutes. For extended storage, slice the cooled bread, place parchment paper between slices, and freeze in a ziplock bag for up to 3 months.
Cast Iron Magic
The cast iron skillet is truly the secret weapon in this recipe. Its ability to retain and distribute heat evenly creates the perfect environment for developing that professional bakery-quality crust. The heavy material mimics the stone hearths of traditional bread ovens. Make sure your skillet is well-seasoned before using to prevent sticking. If you notice your bread browning too quickly on the bottom, place a baking sheet on the rack below your skillet to diffuse some of the direct heat.
Frequently Asked Questions
- → Can you use plain flour?
Sure! It'll just make the bread a bit softer. Mix flours if you'd like. Fresher flour does the job best. Whole wheat flour? It'll need extra water. Sift it first if it's clumpy.
- → Why isn't the yeast foamy?
Make sure your water's warm, not hot. Old yeast can be the problem too. Wait for full ten minutes before you give up. If it still doesn't bubble, open a new pack. Keep yeast stored in a cool spot for the future.
- → What if I don't have a fancy mixer?
Don't worry! Just mix with your hands. Knead the dough by folding and pressing for about 10 minutes. It'll slowly become smooth. Bonus: your arms will get a little workout too!
- → Do I need to heat the pan first?
Not a must. Letting the dough rise in the pan works perfectly fine. Just oil the pan beforehand. While the dough rises, the pan will gently warm up. The oven will take care of the rest!
- → How do I keep the bread fresh?
Once cooled, wrap it tightly. It'll stay good for a couple of days on the counter. You can also freeze it. Toast up slices of older bread, or only cut what you need each time to keep it fresher.
- → What if the bread sticks to my pan?
Use a good oil coating next time. If it's already stuck, run a knife around the edges. Flip the bread out quickly while it’s warm. A well-seasoned skillet helps avoid this!
- → How do I get a crunchy top?
Brush a bit of water on top before baking. Creating steam in the oven also helps—try throwing in some ice cubes. A hot oven is essential. Don’t cover the pan with a lid either.
- → How to travel with the bread?
Wrap the bread while still warm and flat. Use a sturdy box for easy carrying. Slice it when you get there if possible. Bringing along quality butter is always a good idea!
- → What if I want a bigger loaf?
Let it rise longer and keep an eye on it in the oven. Use a larger pan to hold the extra dough. Check the middle to make sure it’s fully cooked—you may need foil to avoid over-browning.
- → Why is the top getting too dark?
Drop the oven temp a bit or shift the pan lower down. Cover the bread loosely with foil if needed. Keep an eye on it so you can take it out earlier next time.
- → How can I make it tastier?
Mix herbs straight into the dough. Brush melted butter on top before serving. Try sprinkling on minced garlic, shredded cheese, or seeds for a nice touch.
- → What if the dough feels sticky?
Work some extra flour in little by little. Wetting your hands can also make handling easier. Letting dough rest longer can help too. Before mixing, oil your tools. Just don’t overdo the flour, or it’ll get too dry.
Conclusion
Enjoy this? Next up, try an olive-topped flatbread. Or make a baguette for something crunchier. Same simple ingredients, new ways to bake it.