
 Pin it
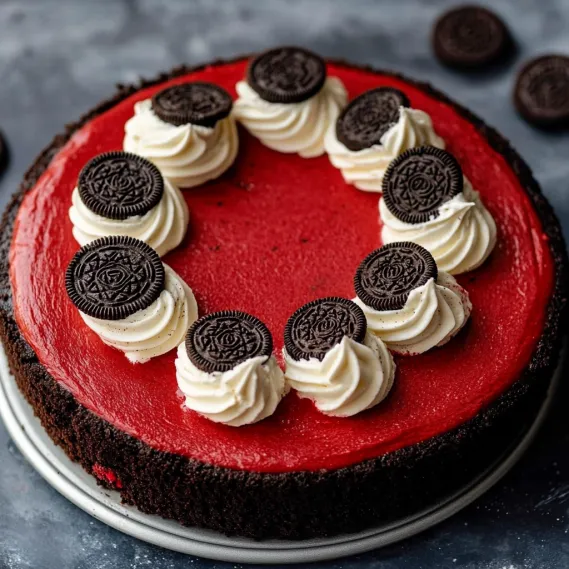
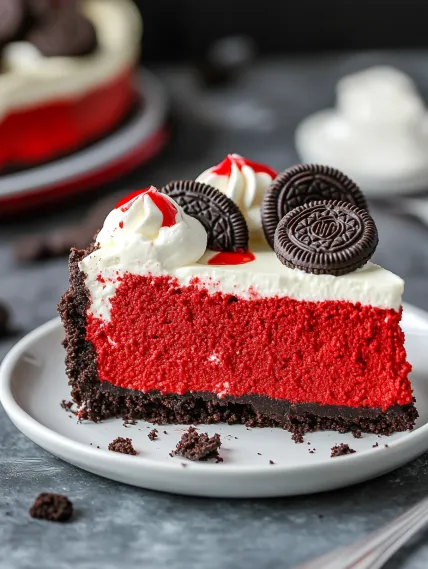
This vibrant red velvet Oreo cheesecake blends two favorite sweets into one knockout dessert that'll wow at any party. The bold crimson filling loaded with Oreo chunks sits on a crunchy chocolate base for a treat that looks just as amazing as it tastes.
I whipped this up for my kid's birthday party and everyone went quiet while they ate. These days, folks ask for it at almost every family get-together, especially during Christmas when that bright red color feels so festive.
Ingredients
- Oreo cookies: they work double duty in the base and middle, adding that famous chocolate kick and fun texture changes
- Full fat cream cheese: brings the richness and smooth feel that makes a good cheesecake work
- Sour cream: cuts through sweetness with a nice tang and helps everything feel silky smooth
- Red gel food coloring: creates that eye-catching color without making your mix too runny
- Cornstarch: keeps everything solid and helps stop annoying cracks from forming
- Vanilla extract: brings all the flavors together and adds that nice smell everyone loves
How To Make Red Velvet Oreo Cheesecake
- Fix up the Oreo base:
- Crush whole Oreos with filling into tiny bits. Stir in melted butter and sugar until damp, then push down hard into your springform pan making an even bottom layer that goes a bit up the sides. Really pack it down so it stays together when you cut it later.
- Whip up the filling:
- Beat softened cream cheese until it's totally smooth before adding anything else. This step really matters for getting rid of lumps. Then mix in sugar, sour cream, vanilla, heavy cream, cornstarch and red coloring just until they come together. Don't overmix or you'll get air bubbles that cause cracks.
- Handle eggs gently:
- Whisk eggs in a bowl first, then slowly add them to your mix on low speed. Stop as soon as they blend in and finish by hand. This gentle touch keeps air out while making sure everything mixes well.
- Build and bake:
- Pour half your red mix over the cool crust, toss in chopped Oreos, then add the rest of the mix. Bake slowly starting at 300°F then drop to 225°F without opening your oven. This slow approach stops those quick temp changes that make cheesecakes crack.
- Let it cool slowly:
- Cooling matters just as much as baking. Let it sit in the turned-off oven for an hour, then another hour with the door slightly open before moving it to the counter. This stops it from shrinking and cracking from sudden temp changes.
 Pin it
The Oreos really shine in this mix. I love how they work differently in the crust and filling with unique textures in each part. My hubby actually came up with adding Oreo chunks to the middle after trying something like it at a bakery nearby, and wow, was he right!
Serving Ideas
This rich cheesecake looks great by itself, but adding some whipped cream, melted chocolate drizzles, and crushed Oreos makes it look super fancy. For extra special occasions, serve each piece with a small scoop of vanilla ice cream and a light sprinkle of cocoa. The mix of hot and cold, smooth and crunchy makes for an amazing dessert moment.
 Pin it
Make-Ahead Ideas
This cheesecake gets even better after a day or two as the flavors blend together. You can make it up to three days early and keep it in the fridge. For the best look, save the whipped cream, chocolate drizzle, and cookie bits to add just before serving. If you need to plan way ahead, you can wrap the finished and cooled cheesecake tightly and freeze it for up to three months. Just let it thaw in the fridge overnight before adding toppings and serving.
Troubleshooting Tips
Got cracks even though you followed all the steps? Don't sweat it. The chocolate drizzle and whipped cream will hide any little problems. Want a smoother texture? Make sure your dairy stuff is truly at room temp before you start. If your crust falls apart when cutting, try popping the cheesecake in the freezer for about 30 minutes, then slice with a warm, clean knife.
The History of Red Velvet
Red velvet cake started way back in Victorian times when cocoa powder would mix with acidic stuff to make a reddish-brown color. These days, we just add food coloring to get that bright red look everyone knows. This cheesecake version brings together that classic taste with the popular Oreo cookie, making something new that tips its hat to both traditions while tasting amazing in its own way.
Frequently Asked Questions
- → What’s the trick to avoid cracks in the cheesecake?
Keep the oven temp low and let the cheesecake cool off inside before taking it out. Don’t mix the batter too much since that can trap air, causing cracks.
- → Why is red gel food coloring used?
Gel food coloring gives the batter a bright, bold color without messing with its texture. It’s the best choice for that classic red velvet look.
- → Can I choose another crust instead of Oreos?
Sure thing! Try graham crackers, chocolate cookies, or vanilla wafers as crust swaps to match your taste.
- → Is it possible to make this ahead of time?
Yep! Prepare it the day before and let it chill in the fridge overnight for the best flavor and texture when you’re ready to serve.
- → What’s the easiest way to cut clean slices?
Warm a sharp knife with hot water before slicing. Wipe it off after each cut to keep the slices nice and clean.
- → How long does this cheesecake last in the fridge?
Leftovers will stay fresh for about five days if you store them in an airtight container in the fridge.