
 Pin it
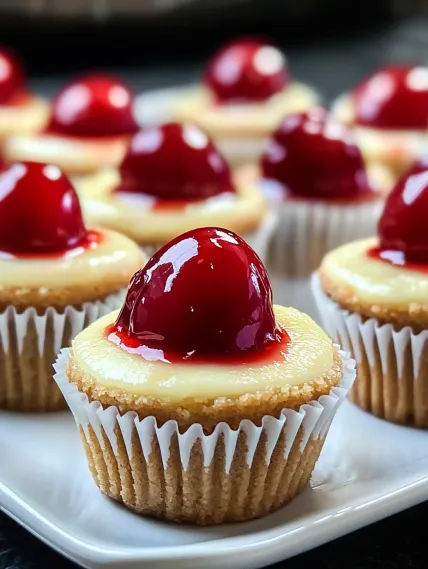
These tiny cheesecakes turn basic ingredients into fancy personal desserts without much work. What makes this so clever is using vanilla wafers as ready-to-go crusts – no grinding, mixing or pushing needed. The smooth cheesecake filling cooks perfectly in just 20 minutes, making a treat that looks like you spent all day in the kitchen when it actually takes less time than going to the store. Topped with cherry filling, these small treats give you all the yummy flavor of regular cheesecake in handy single servings that'll wow everyone.
I found this idea by accident years ago when I needed a quick dessert for my reading group. These mini treats have helped me out tons of times when I want something that seems fancy but takes almost no effort. My nephew, who swears he doesn't like cheesecake, secretly ate three when no one was watching. The empty paper cups in the garbage gave him away.
Key Ingredients and Helpful Selection Advice
- Vanilla Wafer Cookies: Makes an instant bottom without any effort. Each cup gets one cookie as the perfect bite-sized base.
- Cream Cheese: Full-fat is a must for the right feel and taste. Make sure it's totally soft to avoid bumps.
- Sugar: Plain white sugar works best. Powdered stuff can make things too sweet and mess up how it feels.
- Eggs: Gives shape and that real cheesecake texture. Room-warm eggs mix in much better than cold ones.
- Vanilla Extract: Real vanilla brings out all the flavors. Vanilla bean paste is a fancy step up that adds pretty little specks.
I tried using low-fat cream cheese once to make these lighter, and nobody liked it. The texture wasn't as smooth, and the flavor seemed weak. The regular version is totally worth the extra calories – these are meant to be special treats anyway!
Step-by-Step Cooking Guide
- Step 1: Set Up Your Base
- Put paper liners in a regular 12-cup muffin tin – you'll need this for easy removal later. Drop one vanilla wafer into each liner, flat part down. Don't worry about pressing it; the cookie will settle on its own while baking to make the right balance of crust and filling.
- Step 2: Mix Up Creamy Filling
- In a big bowl, beat 16 ounces of softened cream cheese until it's totally smooth with no lumps. With the mixer running slow, slowly add 1/2 cup sugar. Keep mixing until it's well combined and looks light and fluffy around the edges.
- Step 3: Build Texture And Taste
- Put in 2 large eggs one at a time, mixing well after each one until just combined. Stir in 1 teaspoon vanilla and a tiny bit of salt. The mix should look shiny, smooth, and be easy to pour. Don't mix too much or you'll get too many air bubbles.
- Step 4: Pour For Even Portions
- Using a cookie scoop or 1/4-cup measure, share the cheesecake mix evenly between the muffin cups, filling each about 3/4 full. The mix should come just under the top of each liner, leaving room for the cheesecakes to rise a bit while cooking.
- Step 5: Bake Them Just Right
- Cook in a 350°F preheated oven for 20-22 minutes, until middles are nearly set but still wiggle slightly. The tops shouldn't be brown. Let them cool completely in the pan, then chill for at least 2 hours or overnight. Add cherry pie filling right before serving for the prettiest look.
 Pin it
The first time I made these, I was in a hurry and didn't let my cream cheese get soft enough. I ended up with tiny bumps throughout the batter that wouldn't mix out no matter how hard I tried. Now I always put my ingredients out at least an hour before starting, which makes everything go so much better – seriously!
Fantastic Do-Ahead Sweet Treat
One of the best things about these tiny cheesecakes is how early you can make them, which has gotten me out of trouble many times when having guests. I often make them up to two days before a get-together, keeping them in the fridge without toppings. Making them ahead actually makes them taste better as the vanilla flavor grows and the filling sets perfectly. For my sister's 40th birthday party, I made twice as many the day before, then created a topping station with different fruit sauces, chocolate drizzle, and caramel. Everyone made their own custom treats, which not only made my day easier but became what everyone talked about at the party. The trick is adding the toppings just before eating so the cheesecakes don't get soggy.
 Pin it
Easy Twists That Always Work
The simple base recipe makes it super adaptable. During Christmas time, I swap the vanilla wafers for ginger cookies and add 1/2 teaspoon cinnamon to the filling for a holiday twist. For the chocolate fans in my family, an Oreo cookie base with a spoonful of cocoa mixed into the filling makes a cookies-and-cream version that vanishes right away. One version everyone asks for includes 2 teaspoons fresh lemon zest in the batter topped with blueberry jam – the bright citrus really works with the rich creaminess. For grown-up parties, I sometimes add a spoonful of coffee liqueur to the mix and top with a chocolate-covered coffee bean for fancy coffee-flavored bites.
Keeping Them Fresh
Though these cheesecakes rarely stick around long at my house, storing them right keeps them tasty for several days. They stay fresh in a sealed container in the fridge for up to four days without toppings. For keeping them longer, I've found they freeze really well. Just put the cooled, plain cheesecakes on a baking sheet until frozen solid, then move them to a freezer container with baking paper between layers. They'll stay good for up to three months. When you want to eat them, thaw overnight in the fridge and add toppings just before serving. This freezing trick saved me when I needed to make desserts weeks ahead for my daughter's graduation party – nobody could tell they weren't made that morning.
Party-Ready Presentation
These small desserts look amazing at celebrations with just a bit of extra care. For my parents' anniversary dinner, I arranged them on a tiered stand, mixing cherry toppings with blueberry and strawberry for pretty color patterns. For a bridal shower, I placed each cheesecake in a clear plastic cup with the topping showing through the sides, then stuck in little flags with the couple's names. During holiday gatherings, I sometimes sprinkle edible gold or silver sparkles over the fruit topping for a festive look. Even the smallest touch – a mint leaf, a chocolate curl, or a single raspberry – can turn these simple cheesecakes into fancy-looking desserts with hardly any work.
 Pin it
These mini cheesecakes have become my go-to dessert, always requested at family events and the first things to disappear at potlucks. What started as a quick fix has grown into the treat that friends and family connect with special times at my table. There's something really satisfying about making something so impressive with so little effort – it's my favorite kind of kitchen magic trick.
Frequently Asked Questions
- → Can I use something besides cherry topping?
- Sure! These little cheesecakes are really flexible. Try swapping in blueberry or strawberry toppings, fresh fruit, caramel sauce, ganache, whipped cream, or lemon curd. You can even get fancy with a chocolate drizzle or a mint leaf.
- → What if I don't have vanilla wafers?
- No problem! Use graham crackers, Oreo cookies (without cream), gingersnaps, or even shortbread. Put a whole cookie at the bottom or crush and mix with butter to make a crust.
- → Why did the tops sink in the middle after baking?
- It's totally normal to have a little dip in the centers—perfect for toppings! But deep sinking might mean you mixed the batter too much or cooled them down too quickly. Stir gently, especially after adding eggs, and cool gradually before moving to the fridge.
- → Can I make these ahead of time?
- Yep! They're great for prepping early. Keep them in the fridge for up to 4 days or freeze without toppings for 2 months. Add your favorite topping before serving. If frozen, just thaw overnight in the fridge.
- → How do I know when they're baked just right?
- Check for edges that look set while the middle jiggles slightly. Avoid overbaking because it can make them dry or crack. The centers firm up while cooling, so touch lightly—they should feel soft but bounce back.
- → Can I flavor the filling differently?
- For sure! Add lemon juice and zest for a tangy twist, cocoa powder for chocolate flavor, or even swirl in caramel. You can experiment with extracts like coconut, almond, or maple for extra fun.