
 Pin it
These zesty lime squares have become my go-to summer treat, giving you all the bright tangy goodness of classic lime desserts but in handy, easy-to-grab squares.
I came up with these squares for a summer cookout last year, and now my friends won't let me show up without them. The mix of the buttery bottom, zingy filling, and fluffy cream on top makes something so good they're usually gone within minutes at any gathering.
What You'll Need
For The Base
- Vanilla wafer cookies: they make an awesome foundation with their gentle sweetness and soft crunch that works great with the tangy filling
- Unsalted butter: holds everything together and adds a rich taste; grab European butter if you want to fancy it up
- Light brown sugar: brings a hint of caramel flavor that makes the vanilla cookies taste even better
For The Tangy Filling
- Key lime zest: packs tons of flavor from those essential oils; just get the green part and skip the white stuff underneath
- Large egg yolks: they'll give you that smooth, velvety texture; let them come to room temp before using
- Sweetened condensed milk: adds sweetness and helps the filling set up right; don't go for the light version here
- Freshly squeezed lime juice: brings that wake-you-up tanginess; skip the bottle and squeeze your own for way better flavor
For The Fluffy Top
- Heavy whipping cream: needs to be at least 36% fat to whip up nice and thick
- Powdered sugar: adds a touch of sweetness while helping the cream stay fluffy
Steps To Make Them
Getting The Base Ready
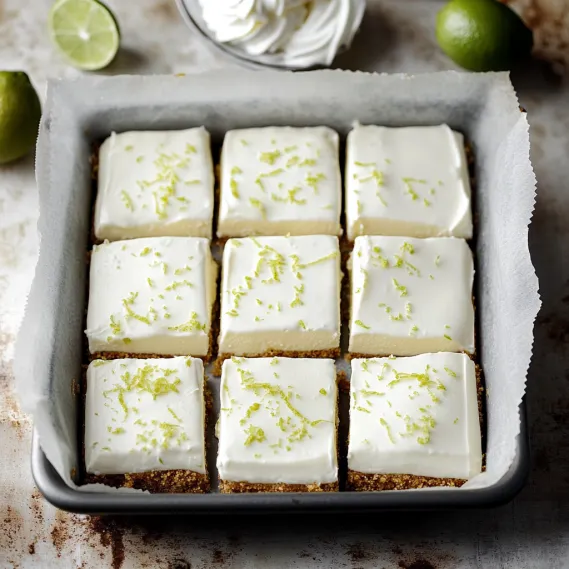
First, put parchment in your pan with some hanging over the sides so you can lift everything out later. This helps you get picture-perfect squares. Smash those vanilla wafers into tiny bits, then mix in the melted butter and brown sugar until it looks like damp sand. Press it down really firmly in the pan—a flat-bottomed cup works great for this. Pop it in the oven till it's slightly golden, around 13-15 minutes. This little bit of toasting really brings out that buttery vanilla taste.
Mixing Up The Filling
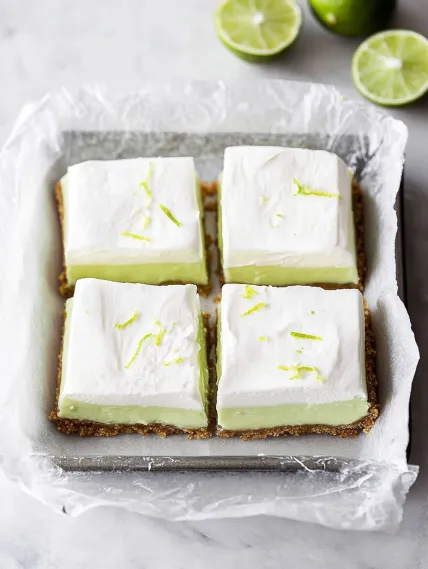
The trick to super smooth filling is all in how you mix it. Beat those egg yolks with lime zest for a full 4-5 minutes until they get noticeably lighter. This puts air in the mix and sets everything up right. Then pour in the condensed milk and keep beating for the whole time I suggest—it builds structure that helps your squares set properly. Add fresh lime juice last, since the acid starts thickening things right away. Pour it onto your cooled base and bake just until it's set but still wobbles a bit, about 15-17 minutes. Don't leave it in too long or you'll lose that silky smoothness.
Adding The Creamy Topping
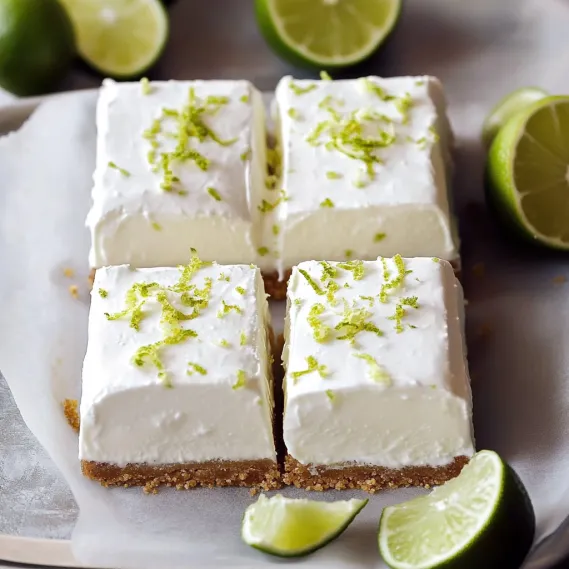
For the best whipped cream, start with everything cold—the cream and even the bowl. Beat until you get firm peaks, then switch to hand whisking at the end so you don't overdo it and make it grainy. Spread it evenly on top of the completely cold filling using a spatula for that bakery-shop look. The contrast between the tangy filling and the lightly sweet cream makes every bite just right.
 Pin it
I just love watching the magic happen when fresh lime juice hits the milk mixture and starts to thicken right before your eyes. It's like cooking magic that always works. My grandma showed me how to use the back of a spoon to squeeze every drop from each lime, and I still do it that way many years later.
Planning Ahead And Keeping
These lime squares are great for planning ahead. They'll stay good in the fridge for up to 4 days if you keep them in a sealed container. If you want to keep them longer, you can freeze them without the whipped cream for up to 3 months. Just let them thaw in the fridge overnight and add fresh whipped cream before serving. Many folks enjoy the interesting texture difference between a fully chilled square and one that's just cool enough to eat.
Swapping Ingredients
Regular limes work great if you can't find key limes. You'll need fewer of them since they're bigger—about 3-4 will do for the same amount of juice. Want a graham crust instead? Just use 1½ cups graham cracker crumbs instead of vanilla wafers. For dairy-free options, you can use plant butter in the crust and coconut whipped topping, but you'll still need regular condensed milk for the filling to set right. For something different, try adding a teaspoon of coconut extract to the filling for a beachy twist.
Ways To Serve
These refreshing squares taste best straight from the fridge, especially on hot days. For a fancy look, put an extra bit of whipped cream and a thin lime slice on top of each one. They go really well with fresh berries on the side—raspberries or blackberries match up nicely with the citrus. For a grown-up version, serve them with a cold glass of limoncello or a mojito for a really fun dessert combo.
 Pin it
Where This Dessert Came From
Lime pie got its start in the Florida Keys back in the late 1800s. Before people had refrigerators, sweetened condensed milk was a staple that wouldn't go bad in hot weather. Clever home cooks found out that the acid in lime juice would thicken the milk without any cooking, making an early no-bake version. Real lime pie never had food coloring in it, despite what some folks think. The genuine filling is actually pale yellow, not green. These squares keep that tradition alive while updating the shape for today's parties.
Frequently Asked Questions
- → Can I swap regular limes for key limes?
Absolutely, though the taste may change slightly. Regular limes are less tangy and aromatic compared to key limes, but they work fine in a pinch.
- → What’s the best way to store these lime bars?
They’ll keep well in the fridge for 4 days if covered tightly. You can also freeze them for later and thaw when ready to enjoy.
- → Can I make lime bars the night before?
Totally! They’re even better when made ahead. Refrigerate overnight for easy cutting and enhanced flavor.
- → How do I cut the bars without making a mess?
Grab a sharp knife, dip it in hot water, dry it off, and slice. Repeat for each cut to keep edges clean.
- → Can I use a different crust cookie?
Of course! Graham crackers or digestive biscuits add a great variation in flavor. Use what you prefer.