
 Pin it
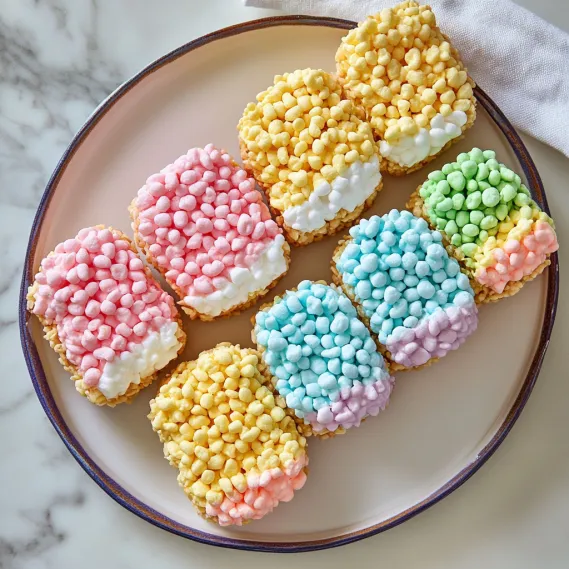
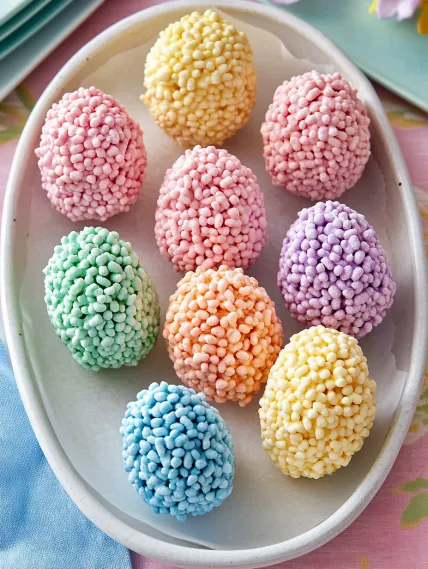
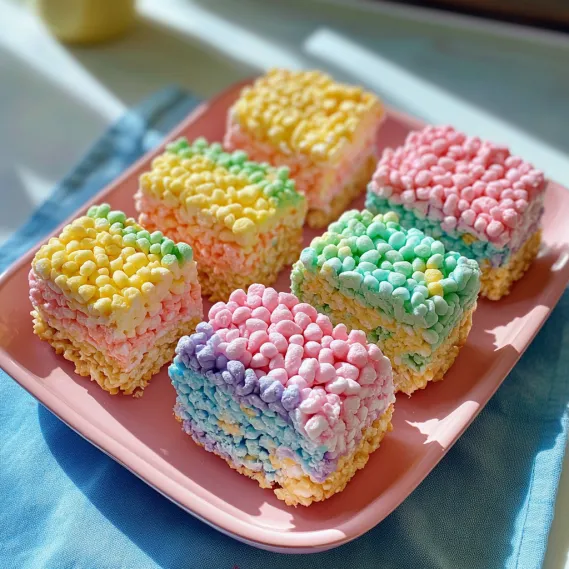
These vibrant Easter Egg Cereal Treats turn ordinary rice cereal snacks into a dazzling spring delight that everyone loves making and eating. Stacked layers of bright, marshmallow-mixed cereal form a gorgeous loaf that, once cut with an egg-shaped cutter, shows off beautiful striped eggs ready to brighten your Easter table. The mix of gooey marshmallow, crunchy cereal, and fun colors grabs both kids and grown-ups. The best part? No oven needed, so it's perfect for making with the little ones.
I whipped these up for my kid's spring class party, and they've stuck around as a yearly must-have in our home. What caught me off guard was watching the kids' faces light up when they spotted the rainbow pattern inside each egg – something about those stacked colors made these simple treats seem almost magical. Even my hubby, who usually doesn't care much about sweets, told me how smart and good-looking they were on our Easter dessert spread.
Key Ingredients and Helpful Picking Tips
- Mini Marshmallows: Grab new, puffy ones for smooth melting. The tiny size works better than big marshmallows, melting quicker and more smoothly.
- Salted Butter: The saltiness cuts through the sweetness just right. If you've only got unsalted, just toss in a tiny bit of salt with each batch.
- Crispy Rice Cereal: The name-brand stuff works best because of its shape and snap, but any rice cereal can do the job. Just make sure it's not stale for the best crunch.
- Food Coloring: Go with gel colors for the brightest look without making the mix too runny and soft.
- Cooking Spray: You'll need this to stop the sticky marshmallow from clinging. Pick one without much flavor like canola oil spray.
I've learned that using fresh marshmallows really changes the game with these treats. Once I tried making them with an old bag from my cupboard, and the mix was super hard to handle and kept falling apart. New marshmallows melt down nicely and give you that perfect chewy bite.
Step-by-Step Cooking Guide
- Step 1: Get Your Pan Ready
- Spray a 9-by-5-inch loaf pan all over with cooking spray, getting into all the corners. Next, put in two strips of parchment paper going different ways with extra hanging over the sides. Give the parchment another spray. This double prep means your layered treat will come out cleanly.
- Step 2: Mix Your First Bright Layer
- Grab a medium bowl that can go in the microwave and put in 1½ cups mini marshmallows with 1 tablespoon butter. Microwave until the marshmallows puff up and butter turns liquid, about 1 minute. Mix until smooth, giving it 30 more seconds if needed. Add your first color and stir until it looks even. Quickly mix in 1½ cups crispy rice cereal until it's all covered.
- Step 3: Build Perfect Flat Layers
- Spray your hands or a spatula with cooking spray so nothing sticks. Push the colored mix firmly into the bottom of your ready pan, making it flat. Work fast since it hardens quickly. Do the same thing three more times with new colors, pushing each fresh layer firmly on top of the last one.
- Step 4: Cool For Easy Cutting
- After all four layers are in, press down hard across the whole top to squish the layers together. Put it in the fridge until very firm, about 20 minutes. This cooling step helps you get clean slices and makes sure your eggs keep their pretty layered look when cut.
- Step 5: Cut Into Easter Eggs
- Using the extra parchment paper on the sides, pull the cereal block out of the pan and take off the paper. With a sharp knife, cut the block sideways into ¾ to 1-inch slices. Then, take a 3 to 4-inch egg-shaped cookie cutter and cut one egg at an angle from each slice to show off the cool striped pattern inside.
 Pin it
The first time I made these, I rushed and didn't cool the loaf enough before cutting. My layers got smooshed and stuck to my knife. Now I know waiting during the cooling step is super important if you want those picture-perfect eggs with sharp, clear color bands.
Picking Your Color Mix
What makes these Easter egg treats stand out is their bright colors, and picking colors that go well together takes them from cute to awesome. I've played with lots of color mixes over time and found that Easter pastels (soft pink, light blue, pale yellow, and mint green) give a classic spring feeling. For something bolder, try bright rainbow colors (red, yellow, green, and blue) that jump out against a white tablecloth. My favorite mix uses different shades of just one color – like four pinks from light to dark – which looks really modern and cool. Whatever colors you pick, think about their order – I've noticed that putting light and dark colors next to each other makes the finished eggs look extra striking.
 Pin it
Fun Ways To Serve
These colorful treats need to be shown off right. I love setting them in a natural Easter "nest" made from shredded wheat or edible Easter grass on a pretty plate. For sit-down dinners, try putting one egg on each person's dessert plate with some small spring flowers. At kids' parties, I've served them with cups of pastel yogurt for dipping, which adds extra flavor and fun. If you're putting these in Easter baskets, wrap each egg in clear wrap with a ribbon for a fancy look that keeps them fresh and easy to handle.
Prep Ahead And Storage Ideas
One thing I really like about these treats is how well they can be made before your holiday party. I've found they stay soft and chewy in a sealed container at room temp for up to three days. For the best texture, don't put them in the fridge after cutting, as this can make them too hard. If you need to make them more than three days early, you can freeze the whole uncut loaf wrapped tight in plastic and foil for up to two weeks. Let it warm up at room temp for about two hours before slicing and cutting into eggs. I've also found that the leftover bits from cutting out the eggs can be pushed together and shaped into colorful "Easter bark" – a no-waste bonus treat that always gets eaten first!
Tasty Twists To Experiment With
While the basic recipe makes beautiful striped eggs, I've come up with several changes that give different looks. For a speckled egg style, mix colored sprinkles into white-colored cereal mixture. To make marbled eggs instead of striped ones, partly mix different colored batches together before pushing into the pan. For a fancy touch at grown-up gatherings, I've added edible gold or silver shimmer dust to the outside edges of the finished eggs. My kids' favorite change uses fruit-flavored rice cereal for extra taste – the strawberry kind paired with pink coloring makes super bright and tasty results.
 Pin it
These Easter Egg Cereal Treats have turned into one of our favorite holiday traditions – not just because they taste great and look amazing, but because making them together builds wonderful family memories. There's something special about turning simple stuff into something so festive and eye-catching. The joy on everyone's faces when they see the colorful striped pattern in each egg makes the sticky hands and kitchen mess totally worth it!
Frequently Asked Questions
- → Can I prepare these snacks in advance?
- Absolutely! Make them 1-2 days ahead. After shaping into eggs, keep them in a sealed container at room temperature with parchment between each layer to stop them from sticking. Don't make them more than a couple of days early though, as they could get stale.
- → What can I use if I don’t have an egg cutter?
- If you’re without an egg cutter, draw an egg outline on a strong piece of cardboard or paper, cut it out, and use it as a template for slicing with a knife. Or just go rectangular for easy, layered cereal bars!
- → Can I use natural dyes instead of artificial ones?
- Of course! Natural dyes can work, but they’ll probably be softer in color than artificial ones. You might need to use larger amounts for strong hues. Try plant-based dyes made from vegetables or fruits for an all-natural option.
- → How do I stop the marshmallow mix from sticking to me?
- Coat your hands with butter or spray them well with cooking spray to avoid sticking. You can also use wax or parchment paper as a barrier while pressing the mixture. A silicone spatula coated in cooking spray can do the trick too!
- → What are some ideas for the leftovers after shaping the eggs?
- Don’t waste those scraps! Squish them into balls for extra snacks, crumble them over ice cream, mix them into cookie batter, or scatter them as decorations on cupcakes or brownies.
- → Can I swap out rice cereal for something else?
- Sure! Try cereals like Cheerios, Chex, Corn Flakes, or even Fruity Pebbles. Use 1½ cups of your chosen cereal for each color layer. Go for Fruity Pebbles if you want even more vibrant layers!