
 Pin it
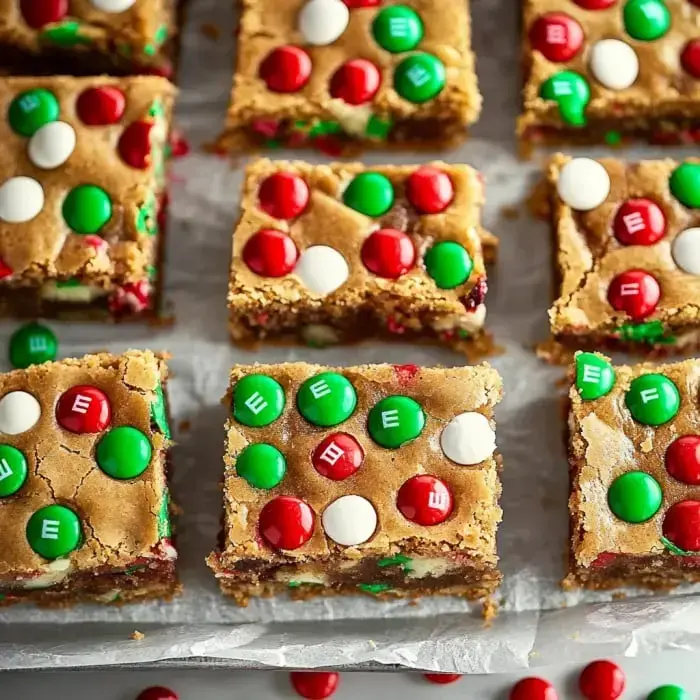
Want a speedy and jolly snack that'll fill your home with holiday aromas? These festive cookie squares taste like amazing blondies dressed up for the holidays with bright M&Ms and festive sprinkles! They're great for holiday exchanges, seasonal gatherings, or just having around when you need something sweet.
What Makes These Special
During the crazy holiday rush, who's got time to shape dozens of separate cookies? These squares deliver all that delicious, chewy yumminess in a single pan. Just combine, dump, bake, and cut! They're also fantastic for preparing beforehand and storing in the freezer, so you'll always have a tasty treat ready for surprise visitors.
Your Ingredient List
- Butter: 1/2 cup unsalted, room temperature - leave it out about 60 minutes
- Brown Sugar: 2 cups firmly packed - this creates that amazing chewiness!
- Eggs: 2 large, cold from the refrigerator works fine
- Vanilla: 1 teaspoon - using pure extract really matters
- Salt: 1/2 teaspoon to cut through the sweetness
- Baking Powder: 1 teaspoon for just enough rise
- Flour: 2 cups all-purpose - nothing fancy needed here
- Holiday M&Ms: 1 cup of those festive red and green ones
- Sprinkles: 1/2 cup Christmas colors - jimmies work wonderfully
Creating Holiday Wonder!
- Prepare Everything
- Heat your oven to 350°F and cover a 9x13 pan with aluminum foil. Spray it thoroughly with cooking spray - sticky squares are no fun!
- Create Your Foundation
- Cream your butter and brown sugar until well combined. Don't stress if it looks somewhat grainy - that's exactly right!
- Incorporate Liquids
- Add your eggs and vanilla. Blend until everything looks smooth and unified.
- Add Dry Components
- Toss in your salt and baking powder, then slowly mix in the flour. Be gentle here - mix only until everything comes together.
- Add Holiday Cheer
- Gently stir in most M&Ms and sprinkles - keep some aside for the top!
- Fill Your Pan
- Push the mixture into your prepared pan (it'll be pretty thick - that's normal!). Scatter those remaining M&Ms and sprinkles on top for visual appeal.
- Into The Oven
- Bake for 22-25 minutes. You want the edges slightly golden, but the center might appear a bit underdone - that's the secret to soft, chewy squares!
Guaranteed Success Every Bake
You know why these bars never disappoint? They're totally simple! No complicated steps or fancy tools required - just mix, spread, bake. They come out soft and chewy without fail, and the brown sugar gives them this incredible almost-caramel flavor.
Seasonal Variations
The coolest thing about these squares? You can adapt them for any celebration! Just swap the M&Ms and sprinkles - try orange and black for Halloween, red and pink for Valentine's, or light pastels for Easter. Same tasty base, completely new appearance!
Tricks For Perfect Results
Wanna know my top trick for amazing squares? Use foil in the pan with some hanging over the sides - it makes getting them out so simple. And another handy hint: take them out when they're slightly underbaked. They'll finish cooking as they cool, giving you that wonderful chewy texture.
 Pin it
Storage Solutions
After your squares cool down, put them in a container with a snug-fitting lid. They'll stay soft and chewy for roughly a week - if they don't vanish before then! Want to get ahead? These freeze amazingly for up to a month. Just wrap them properly and thaw whenever you're craving something sweet.
Customize Your Creation
Don't shy away from tweaking these squares! Throw in some crushed nuts, try different candy chunks, or add a melted chocolate drizzle on top. The basic recipe is so reliable, it's really tough to go wrong. Get creative and turn them into your family's special holiday tradition!
Frequently Asked Questions
- → Can I swap the candy out?
Use any colorful candy—plain chocolates are fine too. Mixing up different types works as long as they’re bright and cheerful.
- → How do I keep these fresh?
Seal them up in a container, and they’ll stay good for a week. For longer, freeze them—up to three months. Add layers of parchment to keep them neat while stacking.
- → Is there a gluten-free option?
Simply swap in a good gluten-free flour mix. Make sure it’s one that works for baking. The batter might need a touch more liquid, and keep an eye on baking time.
- → How can I make these extra soft?
Take them out just before the middle fully sets. Let them cool—they’ll continue firming up as they sit.
- → Can I use these for other holidays?
Change the candy or sprinkle colors to match the occasion. They work for any party, not just Christmas!
- → What do I do if they’re browning too fast?
Lower the oven temperature slightly. You can move the tray to a lower shelf or cover the top with foil if needed. Check on them a bit earlier.
- → How can I pack them for travel?
Layer them carefully in a sturdy box, separated by parchment or wax paper. Keep the box flat to avoid squishing, and bring extras to share!
- → Can this be made even quicker?
Sure! Just mix everything in one bowl to save on cleanup. Prep all your ingredients ahead of time, and you’re set for a speedy bake.
- → What’s the best way to make a big batch?
Double the recipe and use a larger pan. Keep an eye on the center while baking—it might need a little more time. Make sure there’s enough room in your oven.
- → How do I make them sweeter?
Throw in extra candy, more sprinkles, or top with a drizzle of chocolate or even a thin layer of frosting. Just be careful not to go overboard.
- → Why aren’t they setting properly?
They may need a little more time in the oven. Check your oven temperature as well, and make sure the center is just set. Cooling helps them firm up too.
- → Why does my candy look melted or faded?
Save some candy for decorating the top right before baking, or even after they’ve cooled slightly. Press them in gently to avoid excess melting.
Conclusion
If this becomes a favorite, try whipping up some chocolate bark or chewy blondies next. They’re just as festive and easy!