
 Pin it
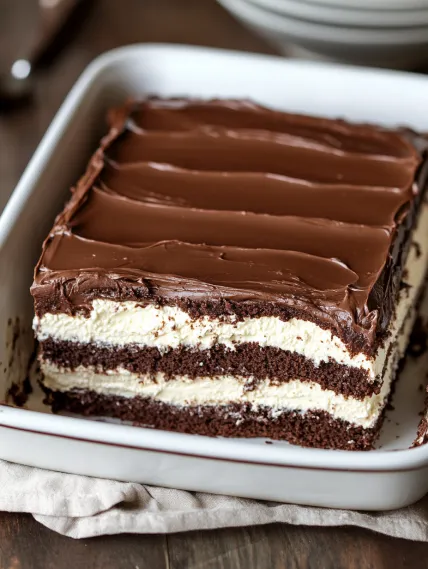
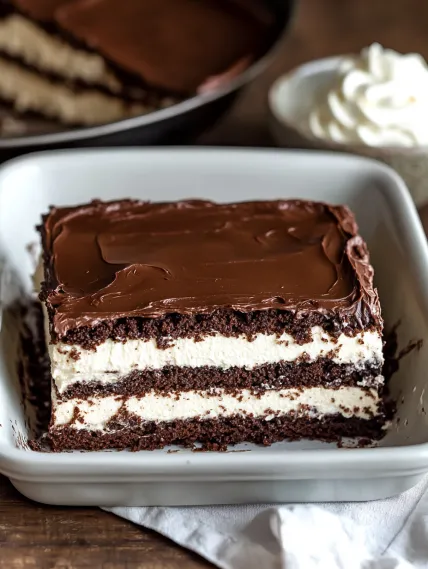
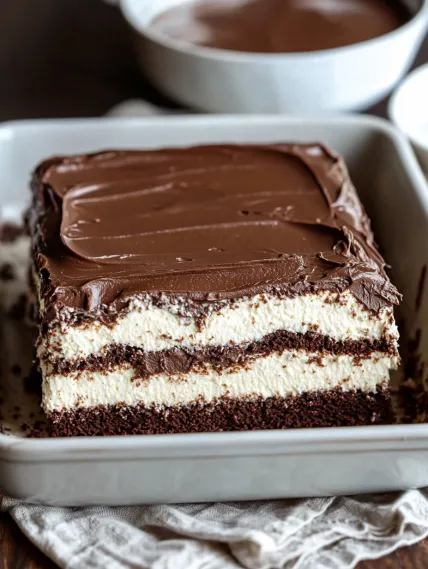
This stunning Italian layered sweet treat brings together fluffy chocolate cake and smooth ricotta in one pan, topped with a silky chocolate frosting. The cool thing? The layers swap places while baking - the ricotta sinks down to make a cheesecake bottom while the cake floats up, creating a mind-blowing dessert that looks super fancy.
I whipped this up for my hubby's birthday after his nonna mentioned it was something he loved as a kid but hadn't eaten in forever. You should've seen his face light up at the first bite - pure happiness mixed with childhood memories. Now we can't have any family celebration without it - the kids ask for it on birthdays, we serve it at anniversaries, and it's always on our holiday table.
Must-Have Ingredients and Smart Picks
- Ricotta Cheese: Go for the full-fat kind for the creamiest results. If it's too wet, let it drain in a strainer for a bit before using.
- Devil's Food Cake Mix: Any box works fine, but grab one with pudding mixed in if you want an extra moist cake.
- Instant Chocolate Pudding Mix: Stick with the regular kind, not sugar-free, so your frosting sets up right.
- Whipped Topping: The stuff in tubs stays firm longer. You can use fresh whipped cream but it might get soft faster.
- Vanilla Extract: Real vanilla makes the ricotta layer taste way better than the fake stuff.
I've learned that getting all your cold stuff to room temp before mixing is super important for making those layers swap places during baking. If the ricotta's still cold from the fridge, it tends to stay put and won't do that cool layer-switching thing.
Step-By-Step Baking Guide
- Step 1: Mix Up Your Ricotta Base
- Grab a big bowl and throw in 2 pounds of room temp ricotta, 1 cup sugar, and 1 teaspoon real vanilla. Beat everything until it's smooth. Then add 4 large eggs one at a time, mixing well after each one. Keep going until there aren't any lumps left.
- Step 2: Whip Up The Chocolate Part
- Take another bowl and mix your devil's food cake box with 1 cup water, 1/2 cup vegetable oil, and 3 large eggs. Beat for about 2 minutes until it's nice and smooth. Pour this into a greased 9×13-inch pan, making sure it reaches all the corners.
- Step 3: Start The Layer Magic
- Now pour your ricotta mix over the chocolate batter, gently spreading it all the way across. Don't stress if it looks backward - that's the cool part! While it bakes, they'll flip-flop with the cake coming to the top and the ricotta settling underneath.
- Step 4: Bake It Slow And Steady
- Pop it into a 350°F oven for about 60-70 minutes. Don't peek for the first 45 minutes or it might sink! You'll know it's done when the middle doesn't jiggle and a toothpick comes out mostly clean.
- Step 5: Top It With Fluffy Frosting
- Let the cake cool for an hour on the counter, then another hour in the fridge. For the topping, mix one pack of instant chocolate pudding with 1 cup cold milk for about 2 minutes. Fold in 8 ounces of thawed whipped topping until it's all the same color. Spread this over your cooled cake and chill at least 4 hours before cutting in.
 Pin it
I was pretty nervous the first time I tried making this. After a few wonky attempts, I figured out that even if they don't look perfect, they still taste amazing. These days my kids jump in to help with the folding, each with their own special way of doing it, and that's become our special thing when we cook together.
Getting That Amazing Texture
What makes these cookies so good is how they're crunchy on the bottom but soft inside. I've tried tons of ways to get this just right. You gotta squeeze all the water out of the cabbage first or everything gets mushy. The cornstarch helps soak up extra moisture while holding everything together. And the cooking trick is what makes it special - you fry, then steam, then fry again. This gives you that awesome crispy bottom while making sure the inside cooks perfectly.
 Pin it
Prep Ahead For Stress-Free Parties
This dessert is such a lifesaver when I'm hosting. I can work on it in chunks when I have time. Sometimes I'll shape and freeze the balls up to a month early, bread them the day before and keep them in the fridge, then just pop them in the oven right before everyone comes over. My whole house smells amazing while they're baking, and guests start drooling the minute they walk in. For big gatherings, I make two batches and keep the extras warm in the oven set really low.
New Ways To Use Leftovers
On the rare chance you don't finish these cookies, they're great in other dishes. Try crumbling them into your morning eggs for a fancy breakfast, or cut them up and toss with some greens and tangy dressing for lunch. My absolute favorite thing to do is put halved cookies on top of a bowl of creamy grits for breakfast - it's so good and lets you enjoy the flavors again the next morning.
 Pin it
Pro Cooking Tricks
- Let them sit for 5 minutes after they come out of the oven - this helps the inside set up just right
- Try adding a bit of smoked paprika to your breadcrumbs for an extra flavor kick
- Can't find cookies nearby? You can get them online from places like Bourgeois Meat Market or The Best Stop
- Put out a few different dips - spicy remoulade and cool ranch alongside your Louisiana sauce
- Want to make it look extra fancy? Arrange everything on a platter with sprinkles of green parsley, purple cabbage, and yellow bell pepper bits to match Mardi Gras colors
Frequently Asked Questions
- → How does the batter layer switch happen in the oven?
- It’s a science thing! The chocolate batter is dense and sinks, while the lighter ricotta mixture drifts upward. Eggs in the ricotta also help it firm up and float, creating those eye-catching layers.
- → Can lighter ricotta or alternatives work in this recipe?
- Using low-fat ricotta’s fine but skip fat-free ones—they can mess with the cake’s texture. Whole milk ricotta’s best for a rich result, and don’t forget to drain any extra liquid so your cake doesn’t end up soggy.
- → Why is chilling the cake so important after baking?
- Chill time lets the flavors blend and the ricotta layer fully set. It’s like letting a tiramisu or cheesecake sit—it always tastes better when it’s rested for a while!
- → Can you save extra cake in the freezer?
- Of course! Once fully chilled, slice it up, wrap pieces tightly in plastic, then put them in a freezer-safe bag or use aluminum foil. They’ll stay fresh up to 2 months. Defrost in the fridge, and you’re ready to enjoy!
- → What’s a good substitute if you don’t have instant pudding?
- If you’re out of pudding mix, melt chocolate with cream to make a ganache. Heat up a cup of cream, pour it over 225 grams of chopped chocolate, wait two minutes, then stir until smooth. Once thick, spread it on like frosting. Another option: whip up some buttercream!
- → How do I check if the cake’s done?
- It’s a bit tricky since the top stays soft and jiggly. Look for edges pulling away from the tray and use a toothpick to test—moist crumbs are fine, but no batter. If the top’s browning too fast, gently cover it with foil so it can bake longer without burning.