
 Pin it
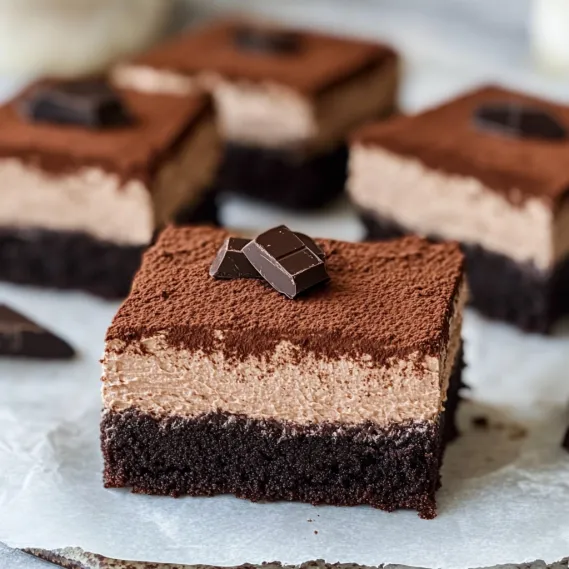
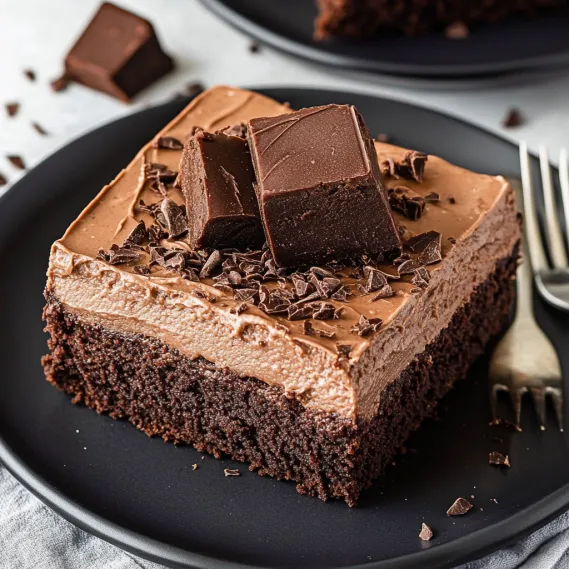
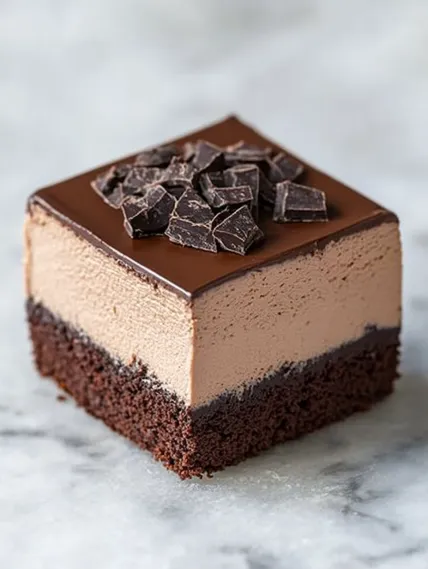
This triple-layer chocolate brownie creation takes everyday brownies to new heights with a luscious three-part dessert that'll wow everyone at your next get-together. The rich brownie foundation supports a velvety chocolate mousse layer and shiny ganache finish on top. It's basically three chocolate treats rolled into one amazing dessert that'll make any chocolate fan beg for seconds.
I originally whipped these up for my sister when I wanted something fancier than regular birthday cake. Everyone's jaws dropped when they saw the three distinct layers after I cut the first slice. Now my family asks for it at practically every celebration we have.
Ingredients
For the Brownie Base
- Unsalted butter: adds that deep richness without extra salt so you can tweak the flavor yourself
- Granulated sugar: brings just enough sweetness and helps form that classic crackly top
- Large eggs: hold everything together while keeping things moist
- Vanilla extract: boosts the chocolate taste with extra flavor depth
- Unsweetened cocoa powder: packs a serious chocolate punch without adding more sugar
- All purpose flour: gives just the right structure without making the brownies too cakey
- Salt: cuts through sweetness while making the chocolate pop
- Baking powder: creates a gentle lift for that perfect texture
For the Chocolate Mousse
- Heavy whipping cream: needs at least 36% fat to make the fluffiest, dreamiest mousse
- Semisweet chocolate: brings balanced sweetness and tastes even better if you splurge on good quality bars
- Milk: creates a smooth base when the chocolate melts
- Powdered sugar: keeps the whipped cream from falling and adds just a touch of sweetness
For the Ganache Topping
- Semisweet chocolate chips: do the job fine but bars melt more evenly
- Heavy cream: makes that gorgeous shiny finish
How To Make Chocolate Mousse Brownies
Prepare the Brownie Base
- Step 1:
- Get your oven running at 350°F and put parchment in your pan with extra hanging over the sides for easy lifting later.
- Step 2:
- Mix your melted butter and sugar together hard for about a minute until they're totally combined.
- Step 3:
- Drop in eggs one by one, mixing well after each, then stir in the vanilla until everything looks shiny and gets a bit thicker.
- Step 4:
- Grab a sifter and add cocoa powder, flour, salt, and baking powder right over your wet mix to avoid lumps.
- Step 5:
- Gently fold it all together until you can't see any dry spots, but don't mix too much or you'll toughen the brownies.
- Step 6:
- Dump the mix into your pan and spread it out evenly all the way to the corners. Bake for 22 minutes flat to get that perfect balance between gooey middle and set edges.
- Step 7:
- Let it cool completely in the pan for about an hour at room temp.
Create the Chocolate Mousse
- Step 1:
- Cut your chocolate into tiny, even bits so it'll melt without problems.
- Step 2:
- Warm up your milk just until tiny bubbles start showing around the edge.
- Step 3:
- Pour the warm milk over your chopped chocolate and don't touch it for 2 minutes. Then stir until it's all smooth.
- Step 4:
- Stick your mixing bowl and beaters in the fridge for 10 minutes to get nice and cold before whipping.
- Step 5:
- Whip your cold cream with the powdered sugar until it forms soft peaks.
- Step 6:
- Fold your cooled chocolate mix into the whipped cream with a light touch. Work fast but gentle. Spread this mousse over your cooled brownies.
- Step 7:
- Pop it in the fridge for at least 2 hours to firm up.
Finish with Ganache
- Step 1:
- Put your finely chopped chocolate in a bowl that can take heat.
- Step 2:
- Warm the heavy cream until small bubbles form at the edges, then pour it over your chocolate.
- Step 3:
- Let it sit untouched for 3 minutes, then stir until it's smooth and glossy. Give the ganache 5 minutes to cool down.
- Step 4:
- Pour your ganache over the mousse layer and smooth it out if needed. Stick it back in the fridge for at least an hour until it's firm.
 Pin it
Semisweet chocolate really makes this dessert shine. I tried making it with milk chocolate once and while it tasted good, it didn't have that rich intensity that makes these brownies so special. My grandma actually teared up the first time I made these for her birthday and said they reminded her of a dessert from her favorite restaurant when she was young.
 Pin it
Ideal Do-Ahead Treat
These brownies actually get better with time, so they're great for planning ahead. The flavors get deeper and the textures settle nicely after a day in the fridge. You can make them up to three days before you need them, just keep them covered in the refrigerator. Let them sit out for about 20 minutes before serving to get the best taste and feel. The difference between the fudgy bottom and creamy middle stands out most when they're not super cold.
Creative Variations
Switch things up to make different flavor combos while keeping that amazing texture mix. Try adding a teaspoon of espresso powder to the brownie part for a coffee-chocolate version that makes the chocolate taste even better. For a minty twist, mix in 1/4 teaspoon of peppermint extract to the mousse and sprinkle crushed candy canes on the ganache before it sets. Make a berry version by spreading a thin layer of raspberry jam between the brownie and mousse. For a fancy finish, top with chocolate curls, gold leaf, or dust lightly with cocoa right before serving.
Troubleshooting Tips
If your mousse won't set right, maybe your cream wasn't cold enough or you whipped it too little or too much. Make sure your cream is super cold and only whip until soft peaks show up. Got ganache that's too thick? Add a spoonful of warm cream and stir until it looks right. Too runny? Let it cool longer or toss in more chopped chocolate. For clean-cut slices, use a sharp knife dipped in hot water and wiped dry between cuts. If your brownies seem too dense next time, try baking them 2 minutes less since ovens can be pretty different from each other.
Frequently Asked Questions
- → What keeps the brownies soft?
Avoid overbaking. Check with a toothpick at 20 minutes for soft crumbs.
- → Can I make mousse early?
Yep, prep it a day ahead, refrigerate it covered, and spread it when ready.
- → Which chocolate is best for this?
Go for top-quality semisweet chocolate for the richest flavor in the mousse and ganache.
- → How can I make ganache smooth?
Let hot cream sit on the chopped chocolate, then gently stir until silky and combined.
- → Can I add my own toppings?
Sure thing! Sprinkle on cocoa powder, chocolate shavings, or fun sprinkles to jazz it up.