
 Pin it
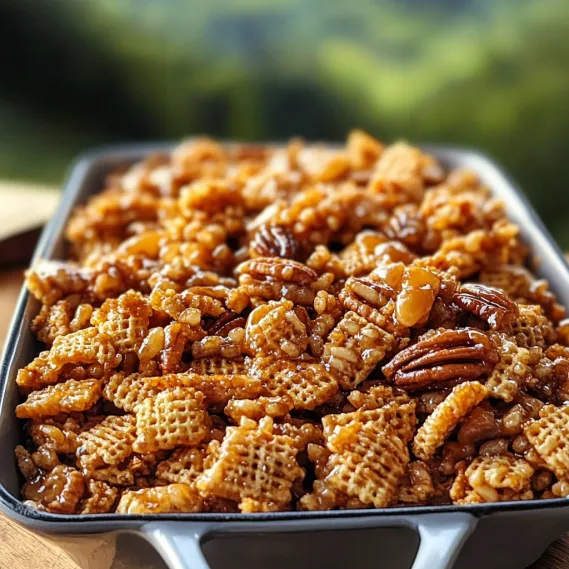
This mouthwatering Praline Crunch turns ordinary cereal and pecans into a sweet, caramel-bathed delight that brings the classic Southern praline taste in a snackable, crunchy form. The real magic starts when crunchy cereal squares and roasted pecans get wrapped in a buttery, brown sugar mixture that turns golden as it bakes, giving you an addictive crunch with warm, rich flavors. You can munch on it as a sweet treat, wrap it up as a handmade gift, or put it out when friends come over - it's simple enough for everyday but fancy enough when you need to impress someone.
The first time I whipped up this Praline Crunch was for a holiday party when I needed something sweet I could make ahead of time. What really caught me off guard was how fast it vanished – folks who said they'd "just try a little bit" kept coming back until the bowl was empty! Everyone kept asking me the same thing all night: "Can I get this recipe?" Now it's what I'm known for bringing to gatherings, and I always double the batch because I know it'll go quick. There's just something about those sweet, buttery, nutty flavors that makes stopping at one handful pretty much impossible.
Key Components and Smart Picking Guide
- Crunchy Rice or Corn Cereal: Go for something that stays firm like Chex (rice or corn) to give you that solid foundation for the sweet coating.
- Pecans: The main player that gives this mix its praline character. Get fresh pecan halves or big chunks for the best taste and satisfying bite.
- Unsalted Butter: Forms the base of your caramel coating. Picking unsalted lets you decide how salty the final product turns out.
- Brown Sugar: Gives that deep, sweet flavor. Dark brown brings stronger molasses notes, while light brown makes for a gentler sweetness.
- Light Corn Syrup: This is a must for making smooth caramel that sticks perfectly to your cereal and nuts.
I found out that giving the pecans a quick toast before mixing them in really brings out their flavor. Just pop them in a 350°F oven for 5-7 minutes and you'll unlock their natural oils, creating a richer, more interesting nutty taste that makes the whole snack mix better.
Step-by-Step Making Instructions
- Step 1: Set Up Your Base
- Turn your oven to a gentle 250°F and put parchment paper or a silicone mat on a big baking sheet to make cleanup easier. In a roomy mixing bowl, mix 6 cups of crispy cereal with 2 cups of pecan halves, tossing them around to mix evenly. Using a big bowl gives you plenty of space to coat everything well without making a mess.
- Step 2: Whip Up Your Caramel Mix
- Put a medium pot over medium heat and melt 1 cup of unsalted butter, then add 1 cup of brown sugar and 1/3 cup of light corn syrup. Keep stirring as you bring it to a soft boil so it doesn't burn. Let it bubble gently for 3-4 minutes until it gets a bit thicker and all the sugar melts, giving you a smooth, shiny caramel.
- Step 3: Add The Magic Touch
- Take your caramel off the heat and right away stir in 1 teaspoon of vanilla extract and 1/2 teaspoon of baking soda. Watch it bubble up and grow – this reaction makes a lighter texture that'll coat everything just right. The caramel changes from thick and heavy to light and fluffy, making it easier to work with.
- Step 4: Mix Everything Together
- Pour your hot caramel over the cereal and pecans in the big bowl. Use a rubber spatula or wooden spoon to gently fold and mix until every bit is covered with the golden mixture. Work fast but careful to make sure everything gets coated before the caramel starts to harden. Don't forget to dig to the bottom where dry stuff often hides.
- Step 5: Bake Till It's Perfect
- Spread your coated mix evenly on the prepared baking sheet. Bake in your preheated oven for 1 hour, stopping to stir every 15 minutes so everything crisps up evenly. This slow, low-temp baking is key – it lets the caramel get perfectly crisp without burning while keeping the cereal and pecans nice and crunchy.
 Pin it
When I first tried making this, I didn't stir it enough during baking and ended up with some bits that were too dark while others stayed kind of soft. These days I set a timer for every 15 minutes to remind me to stir, and that gives me perfectly even crunchiness through the whole batch.
The Sweet Science Behind Caramel
What really makes this Praline Crunch stand out is the caramelization magic that happens when you're making it. Sugar molecules change into those complex, nutty flavors we love in caramel, and adding baking soda creates tiny air pockets that make the texture lighter. I've learned that watching your heat is super important - if you go too hot, sugars burn instead of caramelize and taste bitter. Too low, and you won't get that perfect amber color and deep flavor. When I made this for my sister's baby shower, I rushed the caramel and got a slightly bitter coating. Now I know better - keeping it at a gentle bubble while stirring all the time gives you that amazing butterscotch-like flavor that makes this snack so hard to put down.
 Pin it
Fun Gift Presentation Ideas
One thing I really love about Praline Crunch is how great it looks as a homemade gift. During holiday season, I put it in clear cellophane bags with pretty ribbons, sometimes adding a handwritten recipe card since people always ask for it. For teacher gifts, I fill mason jars with the mix, top them with cute fabric, and add a nice thank you note. My fanciest presentation was for a Southern-themed dinner where I served it in little paper berry baskets lined with checkered fabric. I've even made my own "Katie's Famous Praline Crunch" labels when bringing it as host gifts. This treat works for almost any occasion, from casual get-togethers to fancy gift-giving.
Tasty Twists To Experiment With
While I adore the original version, I've played around with several changes that have become favorites too. If you love chocolate, try adding melted white or dark chocolate drizzled over the cooled mix for an extra touch of sweetness. My husband can't get enough of the version with a teaspoon of cinnamon in the caramel and a tiny bit of cayenne for a sweet-spicy combo that's totally addicting. During the holidays, I sometimes toss in dried cranberries after baking for pretty color and tangy contrast. For something different, try swapping half the pecans for macadamia nuts and add toasted coconut in the last 15 minutes of baking. These changes keep the heart of the original but offer new flavor combos that keep things exciting all year long.
Planning Ahead and Keeping Fresh
One of the best things about Praline Crunch is how long it lasts, making it perfect for making ahead. I've found it actually tastes better a couple days later, after the flavors have had time to mix together. For the freshest crunch, keep it in an airtight container at room temperature for up to two weeks - though at my house, it never sticks around that long! If you need to store it longer, it freezes really well for up to three months in freezer containers. Just let it warm up to room temperature before serving to get that perfect crunch back. When I'm prepping for big parties, I often make several batches weeks before and freeze them, which takes away so much stress as the event gets closer. Just make sure it's totally cool before storing it to avoid moisture that could make it less crunchy.
 Pin it
This Praline Crunch has gone beyond just another recipe in my collection – it's become part of who I am as a cook and host. Friends and family now expect it at gatherings and often ask for it specifically. There's something really satisfying about making something so loved from such basic ingredients. The way those buttery, caramel-coated pieces shine, the amazing smell that fills your home while it bakes, and that perfect balance of sweet, nutty flavors creates a special treat that brings happiness with every crunchy bite.
Frequently Asked Questions
- → Can I switch up the cereal used?
- Absolutely! Rice Chex or Corn Chex are ideal, but you can try others like Crispix or Corn Flakes. Stick to 6 cups of cereal total, and avoid sugary options that can burn while baking.
- → Why add baking soda to the caramel?
- Baking soda reacts with the caramel ingredients, especially the brown sugar, to make tiny bubbles. These bubbles make everything less dense and easier to coat while avoiding rock-solid caramel.
- → Can this work without nuts for allergies?
- For sure! You can swap the pecans with sunflower or pumpkin seeds, or boost the cereal to 8 cups and toss in a couple cups of pretzels. It’ll still have awesome texture and flavor!
- → Why does my crunch feel sticky after cooling?
- Stickiness could mean it didn’t bake long enough or hot enough. Check your oven’s temp and stir every 15 minutes as it bakes. If it’s very humid, you might need an extra 10-15 minutes.
- → How should I wrap this for a gift?
- This mix is great for gifts! Use jars, tins, or cellophane bags, and add a label with details and storage notes. Let your mix cool to avoid soggy packaging!
- → Can I double the amount?
- Totally! Use two pans to keep it spread out so it crisps nicely. Stir every 15 minutes, and if needed, bake a little longer. Halfway through, swap the pans between oven racks.