
 Pin it
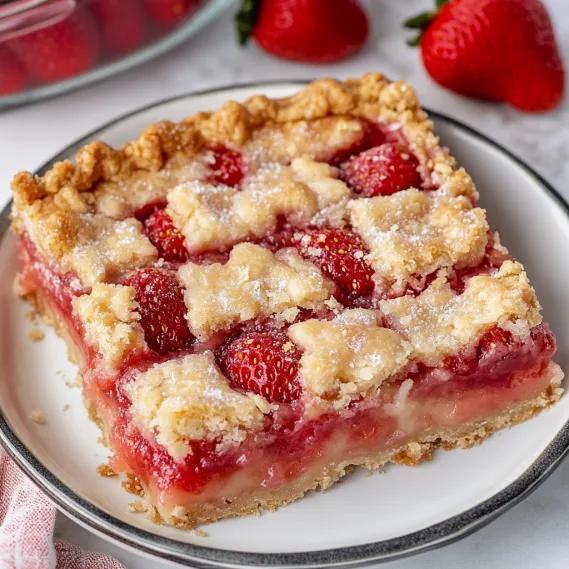
These Strawberry Pie Bars blend shortbread cookie goodness with juicy strawberry filling in one handy treat. They've got a buttery, crisp crust, smooth strawberry-packed middle, and a crumbly top that gives you the perfect bite every time. Though they look fancy, they're actually super easy to make with stuff you probably already have at home. They work great for casual snacks with your morning coffee or as fancy desserts when friends come over.
I'm sitting here watching snow fall outside my window in Minnesota, but I'm dreaming of spring! These Strawberry Pie Bars bring a taste of summer even when it's cold out. I based these on my Blueberry Pie Bars that everyone always asks for. The recipe's super reliable, uses normal kitchen staples, and honestly works just as wonderfully with strawberries as it does with blueberries.
Key Ingredients and Shopping Advice
- All-Purpose Flour: Forms the foundation for both crust and filling. Don't scoop straight from the bag—spoon it into your measuring cups for the softest results.
- Butter: Go for unsalted so you can control how the bars taste. Keep it cold for that classic shortbread texture we're after.
- Fresh Strawberries: The heart of this dessert! Pick completely red berries with no white tops for maximum sweetness. Skip any with mushy spots.
- Sour Cream: Makes the filling rich and slightly tangy to cut through sweetness. Stick with full-fat for the creamiest outcome.
- Eggs: Hold everything together and make the filling silky. Let them sit out a bit before using.
I've learned that strawberry quality can make or break these bars. Once I tried making them with those bland winter strawberries and while they weren't bad, they didn't have that amazing summer taste. Now I only break out this recipe when strawberries are in season or when I spot some really fragrant ones at the local farmer's market.
Step-by-Step Cooking Guide
- Step 1: Build Your Crust Foundation
- Get your oven hot at 350°F and coat a 7x11-inch glass dish with butter or cooking spray. In a big bowl, mix 1½ cups flour, ¾ cup sugar, and a tiny bit of salt. Drop in 1½ sticks of cold butter cut into chunks. Use a pastry tool to work it all together until it looks like rough sand. Set aside ¾ cup for later, then push the rest firmly into your prepared dish.
- Step 2: First Round Of Baking
- Slide the crust into the oven for 15 minutes until it's just set but not getting brown yet. This quick pre-bake is super important—it keeps your crust from getting soggy later. While that's happening, get your filling ready so you can move quickly when the crust comes out.
- Step 3: Mix Your Creamy Center
- In another big bowl, beat 2 eggs really well. Add 1 cup sugar, ½ cup sour cream, ⅓ cup flour, and a pinch of salt, mixing until it's all smooth. This mixture turns into a creamy base that sets around the fruit as it bakes, giving you that perfect soft texture.
- Step 4: Bring In The Berries
- Carefully mix 3 cups of chopped fresh strawberries into your creamy mixture. Don't stir too hard or you'll break up the berries and end up with pink goo. Pour everything evenly over your hot crust, making sure the strawberry chunks are spread out nicely.
- Step 5: Top It And Finish Baking
- Sprinkle that crust mixture you saved earlier all over the top. Bake for 45-55 minutes until the topping turns golden and the filling doesn't wiggle when you gently shake the pan. Let everything cool completely for at least an hour before cutting if you want neat squares.
 Pin it
My first try with these bars taught me a lesson—I got too eager and sliced them while they were still warm. They tasted amazing but looked like a total mess! Now I always make sure they cool completely, which gives me perfect squares that stay together when you pick them up.
Impressive Party Dessert
These Strawberry Pie Bars have become my go-to party treat because I can make them the day before and they get even tastier overnight. During summer get-togethers, I often make both these and the blueberry version for a red, white and blue dessert spread that always gets compliments. At the last baby shower I threw, I cut them into tiny squares and stacked them on a fancy tiered stand with other small desserts. They looked gorgeous, and guests loved grabbing a sweet bite without needing to mess with forks. They travel really well too—I've brought them to countless cookouts and picnics where they stand up fine even on hot days, which makes them way more practical than trying to serve actual pie.
 Pin it
Switch Up Your Berries
While the strawberry version might be my favorite, one of the best things about these bars is how easily you can change them up. When blueberries are everywhere in summer, I swap them in for an equally yummy treat. When cherry season hits, pitted fresh cherries make a grown-up version that's amazing with a scoop of vanilla ice cream on top. Late summer raspberries create a lighter, slightly tart version that goes perfectly with afternoon tea. I've even used thawed and drained frozen berries in winter when I'm missing summer flavors. The basic method stays the same—just use different fruit and adjust the sugar a bit depending on how naturally sweet your berries are.
Prep Ahead Benefits
As someone who's always short on time, I really love that these bars can be made early without getting soggy or stale. I usually bake them the night before I need them, let them cool all the way, and then pop them in the fridge overnight. This not only saves me time on the day I'm serving them but actually makes them taste better and slice cleaner. The filling gets perfectly set, the flavors blend together, and they cut into neat squares. I've also found that these freeze really well—I cut them into single pieces, wrap each one separately, and freeze for up to a month. This way, I can grab just one or two whenever I'm craving something sweet or when friends drop by unexpectedly.
Kid-Friendly Baking Fun
These Strawberry Pie Bars have turned into a favorite cooking activity with my kids. The different parts offer great jobs for little helpers—younger children can wash and cut strawberries with a plastic knife or scatter the crumb topping, while bigger kids can measure stuff and mix the filling. My daughter loves putting different berries in different sections of the pan, making her own mixed berry version that shows off her creativity. Since they don't take forever to bake, kids don't get bored waiting to see how they turn out, and the simple steps help build their confidence in the kitchen. Best of all, the tasty results reward their hard work and create sweet memories of our time baking together.
 Pin it
These Strawberry Pie Bars have become one of my most requested treats, with friends and family asking for them all summer long. There's something special about the mix of buttery crust, creamy filling, and fresh strawberries that captures summer in a convenient, grab-and-go form. Whether you're enjoying them with an afternoon coffee, packing them for a picnic, or serving them to end a summer dinner party, they always bring smiles and requests for the recipe.
Frequently Asked Questions
- → Can frozen strawberries work instead of fresh?
- Sure! Thaw frozen berries first, then drain off extra juice to prevent a soggy filling. Pat them dry with a towel, and you might want to mix in an extra tablespoon of flour to soak up the extra moisture during baking.
- → Is it okay to swap the strawberries for other fruits?
- Yes, it’s flexible! Use blueberries, raspberries, peaches, or a mix of fruits. Peaches might need peeling and dicing small. Stick with 3 cups total. Juicier fruits may need an extra tablespoon of flour.
- → How can I tell when the bars are done baking?
- Look for lightly golden topping and a set, slightly jiggly filling in the middle—like a soft custard. A toothpick should come out mostly clean. Let them cool an hour after baking to fully set before cutting.
- → Can I make these ahead for a gathering?
- Totally! Bake them up to two days in advance, and keep them tightly covered in the fridge. For serving, let them sit at room temp for 30 minutes. They freeze well too; just thaw overnight in the fridge before serving!
- → How do I cut these bars into cleaner slices?
- Cool them all the way, or even refrigerate first. Use a sharp knife and wipe it clean after each slice. For even neater pieces, chill the whole pan, lift the bars out using paper, and cut on a board outside the pan.
- → Can I cut back on the sugar here?
- Yes, though it’ll change sweetness and texture a bit. For the crust/topping, go with 1/2 cup sugar. For the filling, if your strawberries are sweet, you might reduce to 3/4 cup. Less sugar could make the bars more tart and softer.